C#.net 에서 Mysql 접속방법

다운로드 : http://dev.mysql.com/downloads/connector/net/
원문 : http://dev.mysql.com/doc/refman/5.1/en/connector-net-tutorials-entity-framework-winform-data-source.html
초간단 사용법 : http://dev.mysql.com/doc/refman/5.1/en/connector-net-tutorials-intro.html

더 간단하게 쓰라고
MySql.Data.MySqlClient 안에 MySqlHelper 가 들어가 있습니다.
간단한 사용법 http://www.dreamincode.net/forums/topic/199334-using-mysqlhelper/


여기서부터는 엔티티 만들어서 사용하는방법
20.2.4.5. Tutorial: Using an Entity Framework Entity as a Windows Forms Data Source

In this tutorial you will learn how to create a Windows Forms Data Source from an Entity in an Entity Data Model. This tutorial assumes that you have installed the World example database, which can be downloaded from the MySQL Documentation page. You can also find details on how to install the database on the same page. It will also be convenient for you to create a connection to the World database after it is installed. For instructions on how to do this see Section 20.2.3.1, “Making a connection”.

Creating a new Windows Forms application

The first step is to create a new Windows Forms application.

  1. In Visual Studio, select File, New, Project from the main menu.

  2. Choose the Windows Forms Application installed template. Click OK. The solution is created.

Adding an Entity Data Model

You will now add an Entity Data Model to your solution.

  1. In the Solution Explorer, right-click your application and select Add, New Item.... From Visual Studio installed templates select ADO.NET Entity Data Model. Click Add.

    Figure 20.38. Add Entity Data Model

    Add Entity Data Model
  2. You will now see the Entity Data Model Wizard. You will use the wizard to generate the Entity Data Model from the world example database. Select the icon Generate from database. Click Next.

    Figure 20.39. Entity Data Model Wizard Screen 1

    Entity Data Model Wizard Screen
              1
  3. You can now select the connection you made earlier to the World database. If you have not already done so, you can create the new connection at this time by clicking New Connection.... For further instructions on creating a connection to a database see Section 20.2.3.1, “Making a connection”.

    Figure 20.40. Entity Data Model Wizard Screen 2

    Entity Data Model Wizard Screen
              2
  4. Make a note of the entity connection settings to be used in App.Config, as these will be used later to write the necessary control code.

  5. Click Next.

  6. The Entity Data Model Wizard connects to the database. You are then presented with a tree structure of the database. From this you can select the object you would like to include in your model. If you had created Views and Stored Routines these will be displayed along with any tables. In this example you just need to select the tables. Click Finish to create the model and exit the wizard.

    Figure 20.41. Entity Data Model Wizard Screen 3

    Entity Data Model Wizard Screen
              3
  7. Visual Studio will generate the model and then display it.

    Figure 20.42. Entity Data Model Diagram

    Entity Data Model Diagram
  8. From the Visual Studio main menu select Build, Build Solution, to ensure that everything compiles correctly so far.

Adding a new Data Source

You will now add a new Data Source to your project and see how it can be used to read and write to the database.

  1. From the Visual Studio main menu select Data, Add New Data Source.... You will be presented with the Data Source Configuration Wizard.

    Figure 20.43. Entity Data Source Configuration Wizard Screen 1

    Entity Data Source Configuration Wizard
              Screen 1
  2. Select the Object icon. Click Next.

  3. You will now select the Object you wish to bind to. Expand the tree. In this tutorial you will select the city table. Once the city table has been selected click Next.

    Figure 20.44. Entity Data Source Configuration Wizard Screen 2

    Entity Data Source Configuration Wizard
              Screen 2
  4. The wizard will confirm that the city object is to be added. Click Finish.

    Figure 20.45. Entity Data Source Configuration Wizard Screen 3

    Entity Data Source Configuration Wizard
              Screen 3
  5. The city object will be display in the Data Sources panel. If the Data Sources panel is not displayed, select Data, Show Data Sources from the Visual Studio main menu. The docked panel will then be displayed.

    Figure 20.46. Data Sources

    Data Sources

Using the Data Source in a Windows Form

You will now learn how to use the Data Source in a Windows Form.

  1. In the Data Sources panel select the Data Source you just created and drag and drop it onto the Form Designer. By default the Data Source object will be added as a Data Grid View control. Note that the Data Grid View control is bound to the cityBindingSource and the Navigator control is bound to cityBindingNavigator.

    Figure 20.47. Data Form Designer

    Data Form Designer
  2. Save and rebuild the solution before continuing.

Adding Code to Populate the Data Grid View

You are now ready to add code to ensure that the Data Grid View control will be populated with data from the City database table.

  1. Double-click the form to access its code.

  2. Add code to instatiate the Entity Data Model's EntityContainer object and retrieve data from the database to populate the control.

    Figure 20.48. Adding Code to the Form

    Adding Code to the Form
  3. Save and rebuild the solution.

  4. Run the solution. Ensure the grid is populated and you can navigate the database.

    Figure 20.49. The Populated Grid Control

    The Populated Grid Control

Adding Code to Save Changes to the Database

You will now add code to enable you to save changes to the database.

The Binding source component ensures that changes made in the Data Grid View control are also made to the Entity classes bound to it. However, that data needs to be saved back from the entities to the database itself. This can be achieved by the enabling of the Save button in the Navigator control, and the addition of some code.

  1. In the Form Designer, click the Save icon in the Form toolbar and ensure that its Enabled property is set to True.

    Figure 20.50. Save Button Enabled

    Save Button Enabled
  2. Double-click the Save icon in the Form toolbar to display its code.

  3. You now need to add code to ensure that data is saved to the database when the save button is clicked in the application.

    Figure 20.51. Adding Save Code to the Form

    Adding Save Code to the Form
  4. Once the code has been added, save the solution and rebuild it. Run the application and verify that changes made in the grid are saved.


데이터템플릿 안의 유저컨트롤에 걍 값을 바인딩하면 오류가 난다.

        
	public string UserName { set; get; }//오류발생
        public UserControl1()
        {
            InitializeComponent();
            //UserName 값을 받아서 유저컨트롤에서 특정행위를 하고싶다.
        }

image


이때는 DependencyProperty 등록을 해주면된다.


사용되는 데이터

    public class Person
    {
        public int Age { set; get; }
        public string Name { set; get; }
    }

메인창

아래보면 llistboxPerson 리스트박스에 DataTemplate1 으로 나타내고있다.

DataTemplate1 안에는 또 UserControl1이 있으며 UserName="{Binding Name}" 값을 바인딩하고 있다.

<Window
        xmlns="http://schemas.microsoft.com/winfx/2006/xaml/presentation"
        xmlns:x="http://schemas.microsoft.com/winfx/2006/xaml"
        xmlns:d="http://schemas.microsoft.com/expression/blend/2008" xmlns:mc="http://schemas.openxmlformats.org/markup-compatibility/2006" xmlns:i="http://schemas.microsoft.com/expression/2010/interactivity" xmlns:ei="http://schemas.microsoft.com/expression/2010/interactions" xmlns:local="clr-namespace:테스트용" mc:Ignorable="d" x:Class="테스트용.MainWindow"
        Title="MainWindow" Height="350" Width="525">
    <Window.Resources>
        <DataTemplate x:Key="DataTemplate1">
            <Grid Height="85" Width="252">
                <local:UserControl1 HorizontalAlignment="Stretch" Height="Auto" Margin="0,2,0,0" VerticalAlignment="Stretch" Width="Auto" UserName="{Binding Name}"/>                
            </Grid>
        </DataTemplate>
    </Window.Resources>
    <Grid >
        <Grid.Background>
            <LinearGradientBrush EndPoint="0.5,1" StartPoint="0.5,0">
                <GradientStop Color="#FF686868" Offset="0"/>
                <GradientStop Color="#FF606060" Offset="1"/>
            </LinearGradientBrush>
        </Grid.Background>        
        <Grid.RowDefinitions>
            <RowDefinition/>
        </Grid.RowDefinitions>
        <Grid.ColumnDefinitions>
            <ColumnDefinition/>
        </Grid.ColumnDefinitions>
        <ListBox Margin="12,12,0,118" ItemTemplate="{DynamicResource DataTemplate1}" Name="llistboxPerson" HorizontalAlignment="Left" Width="479" />
    </Grid>
</Window>

데이터템플릿

유저컨트롤의 UserName="{Binding Name}" 이런씩으로 값을 바인딩하고 있다.

    <Window.Resources>
        <DataTemplate x:Key="DataTemplate1">
            <Grid Height="85" Width="252">
                <local:UserControl1 HorizontalAlignment="Stretch" Height="Auto" Margin="0,2,0,0" VerticalAlignment="Stretch" Width="Auto" UserName="{Binding Name}"/>                
            </Grid>
        </DataTemplate>
    </Window.Resources>


유저컨트롤

.xaml

    <Grid>
        <TextBlock HorizontalAlignment="Left" TextWrapping="Wrap" Text="데이터템플릿의 바인딩값을 유저컨트롤에 넘겨주기" VerticalAlignment="Top" Background="#FF8F8F8F" Width="296" />
        <Label Content="{Binding Path=Name}" Height="36" HorizontalAlignment="Left" Margin="127,22,0,0" Name="label1" VerticalAlignment="Top" Width="157" />
        <Label Content="유저컨트롤바인딩값:" Height="36" HorizontalAlignment="Left" Margin="5,22,0,0" Name="label2" VerticalAlignment="Top" Width="124" />
    </Grid>

.cs

    /// <summary>
    /// UserControl1.xaml에 대한 상호 작용 논리
    /// </summary>
    public partial class UserControl1 : UserControl
    {

        /// <summary>
        /// The dependency property of the ProgressReporter UserControl to display in the GUI
        /// </summary>
        public static DependencyProperty PercentProperty = DependencyProperty.Register("UserName", typeof(string), typeof(UserControl1));
        /// <summary>
        /// The PercentToShow value
        /// </summary>
        public string UserName
        {
            get
            {
                return (string)GetValue(PercentProperty);
            }
            set
            {
                SetValue(PercentProperty, value);
            }
        }

        public UserControl1()
        {
            InitializeComponent();            
        }
    }

추가정보

http://msdn.microsoft.com/query/dev10.query?appId=Dev10IDEF1&l=KO-KR&k=k(SYSTEM.WINDOWS.DEPENDENCYPROPERTY);k(TargetFrameworkMoniker-%22.NETFRAMEWORK%2cVERSION%3dV4.0%22);k(DevLang-CSHARP)&rd=true


비주얼스튜디오에 기본내장되어져 있는Microsoft 보고서

라이센스도 무료고 나름 강력한 리포트!


UI 만들기

WPF 에서는 리포트 뷰 따위가 없기때문에 WindowsFormsHost 이용해서 WinFrom 의 컨트롤을 이용한다.
<WindowsFormsHost Name="windowsFormsHost1" Margin="0,46,0,0" />         
간지난다!
 
        void MainWindow_Loaded(object sender, RoutedEventArgs e)
        {
            ReportViewer reportViewer = new ReportViewer();

            reportViewer.ProcessingMode = ProcessingMode.Local;
            reportViewer.LocalReport.ReportEmbeddedResource = "테스트용.Report2.rdlc";
            
            this.windowsFormsHost1.Child = reportViewer;
            reportViewer.RefreshReport();
        }
 

바인딩에 사용될 개체

    public class Person
    {
        public int Age { set; get; }
        public string Name { set; get; }
    }

리포트 만들기

Person 개체를 리포트에서 뿌려줄꺼이므로 데이터소스에서 Person을 선택

개체선택
 
바인딩할려는 대상개체를 선택합니다. 아래와 같이 만들어진다.
 
보고서 데이터 이거 볼려면 보기 > 보고서 데이터 클릭
매개변수에 바로 접근도 가능
reportViewer.LocalReport.SetParameters(new ReportParameter("Title", "이미지 로드 테스트"));
 

Person 리스트 만들기

테이블을 끌어서 리포트에 적용.
 
 
대략 발로 만들어진 리포트
 
이상하게 머릿글 입력하는 부분에 직접 Name을 적으면 N a m e 이렇게 글자가 퍼진다 ㅡ_ㅡ
문자를 붙여넣기하면 바로 나옴> 
 

데이터 바인딩하기

위에서 데이터 집합 이름을 DataSet1 으로 선언했따 여기에 List<Person> 담아주면 끗
        void MainWindow_Loaded(object sender, RoutedEventArgs e)
        {
            ReportViewer reportViewer = new ReportViewer();

            reportViewer.ProcessingMode = ProcessingMode.Local;
            reportViewer.LocalReport.ReportEmbeddedResource = "테스트용.Report2.rdlc";
            
            //데이터 바인딩
            List<Person> personList = new List<Person>();
            personList.Add(new Person() { Age = 10, Name = "kojaedoo1" });
            personList.Add(new Person() { Age = 20, Name = "kojaedoo2" });
            personList.Add(new Person() { Age = 30, Name = "kojaedoo3" });
            personList.Add(new Person() { Age = 40, Name = "kojaedoo4" });

            ReportDataSource personListSource = new ReportDataSource("DataSet1", personList);
            reportViewer.LocalReport.DataSources.Add(personListSource);
            
            this.windowsFormsHost1.Child = reportViewer;
            reportViewer.RefreshReport();
        }


리포트뷰어에서 이미지 출력하기

보고서 데이터에 매개변수를 추가한다. ReportLogo 이게 왼쪽에 
이미지가 바인딩된다.
이미지에서 속성보기를 클릭
이미지 원본선택에서 데이터베이스로 선택
필드에서 : =System.Convert.FromBase64String(Parameters!ReportLogo.Value) //ReportLogo는 아까 만든 매개변수이름
MIME 형식사용에서 : image/png


웹클라이언트로 이미지를 받아와서 ToBase64String로 변경한다.


WebClient wc = new WebClient();
Stream imageStream = wc.OpenRead("https://t1.daumcdn.net/cfile/tistory/177612134B839BE557");
string baseLogo = ConvertImageToBase64(System.Drawing.Image.FromStream(imageStream), System.Drawing.Imaging.ImageFormat.Bmp);

reportViewer.LocalReport.SetParameters(new ReportParameter("ReportLogo", baseLogo));


//ConvertImageToBase64소스
        private string ConvertImageToBase64(System.Drawing.Image image, System.Drawing.Imaging.ImageFormat format)
        {
            byte[] byteImage;
            using (System.IO.MemoryStream imageStream = new System.IO.MemoryStream())
            {
                image.Save(imageStream, format);
                byteImage = new byte[imageStream.Length];
                imageStream.Seek(0, System.IO.SeekOrigin.Begin);

                imageStream.Read(byteImage, 0, (int)imageStream.Length);
            }

            return System.Convert.ToBase64String(byteImage);

        }


전체소스

using System;
using System.Collections.Generic;
using System.Linq;
using System.Text;
using System.Windows;
using System.Windows.Controls;
using System.Windows.Data;
using System.Windows.Documents;
using System.Windows.Input;
using System.Windows.Media;
using System.Windows.Media.Imaging;
using System.Windows.Navigation;
using System.Windows.Shapes;
using System.Diagnostics;
using System.Runtime.InteropServices;
using Microsoft.Reporting.WinForms;
using System.Net;
using System.IO;

namespace 테스트용
{
    /// <summary>
    /// MainWindow.xaml에 대한 상호 작용 논리
    /// </summary>
    public partial class MainWindow : Window
    {


        public MainWindow()
        {
            this.Loaded += new RoutedEventHandler(MainWindow_Loaded);
        }

        void MainWindow_Loaded(object sender, RoutedEventArgs e)
        {
            ReportViewer reportViewer = new ReportViewer();

            reportViewer.ProcessingMode = ProcessingMode.Local;
            reportViewer.LocalReport.ReportEmbeddedResource = "테스트용.Report2.rdlc";
            
            //데이터 바인딩
            List<Person> personList = new List<Person>();
            personList.Add(new Person() { Age = 10, Name = "kojaedoo1" });
            personList.Add(new Person() { Age = 20, Name = "kojaedoo2" });
            personList.Add(new Person() { Age = 30, Name = "kojaedoo3" });
            personList.Add(new Person() { Age = 40, Name = "kojaedoo4" });

            ReportDataSource PersonnelEducation = new ReportDataSource("DataSet1", personList);
            reportViewer.LocalReport.DataSources.Add(PersonnelEducation);


            reportViewer.LocalReport.SetParameters(new ReportParameter("Title", "이미지 로드 테스트"));


            WebClient wc = new WebClient();
            Stream imageStream = wc.OpenRead("https://t1.daumcdn.net/cfile/tistory/177612134B839BE557");
            string baseLogo = ConvertImageToBase64(System.Drawing.Image.FromStream(imageStream), System.Drawing.Imaging.ImageFormat.Bmp);

            reportViewer.LocalReport.SetParameters(new ReportParameter("ReportLogo", baseLogo));

            this.windowsFormsHost1.Child = reportViewer;
            reportViewer.RefreshReport();
        }


        private string ConvertImageToBase64(System.Drawing.Image image, System.Drawing.Imaging.ImageFormat format)
        {
            byte[] byteImage;
            using (System.IO.MemoryStream imageStream = new System.IO.MemoryStream())
            {
                image.Save(imageStream, format);
                byteImage = new byte[imageStream.Length];
                imageStream.Seek(0, System.IO.SeekOrigin.Begin);

                imageStream.Read(byteImage, 0, (int)imageStream.Length);
            }

            return System.Convert.ToBase64String(byteImage);

        }

    }


}

더많은 정보

http://msdn.microsoft.com/query/dev10.query?appId=Dev10IDEF1&l=KO-KR&k=k(VS100.RTP.RPTDESIGNER.LAYOUTVIEW.F1);k(TargetFrameworkMoniker-%22.NETFRAMEWORK%2cVERSION%3dV4.0%22)&rd=true

http://code.google.com/p/macfuse/


MacFUSE allows you to extend Mac OS X's native file handling capabilities via 3rd-party file systems. It is used as a software building block by dozens of products.

As a user, installing the MacFUSE software package will let you use any 3rd-party file system written atop MacFUSE.

As a developer, you can use the MacFUSE SDK to write numerous types of new file systems as regular user-mode programs. The content of these file systems can come from anywhere: from the local disk, from across the network, from memory, or any other combination of sources. Writing a file system using MacFUSE is orders of magnitude easier and quicker than the traditional approach of writing in-kernel file systems. Since MacFUSE file systems are regular applications (as opposed to kernel extensions), you have just as much flexibility and choice in programming tools, debuggers, and libraries as you have if you were developing standard Mac OS X applications.

In more technical terms, MacFUSE implements a mechanism that makes it possible to implement a fully functional file system in a user-space program on Mac OS X (10.4 and above). It provides multiple APIs, one of which is a superset of the FUSE (File-system in USEr space) API that originated on Linux. Therefore, many existing FUSE file systems become readily usable on Mac OS X.

The MacFUSE software consists of a kernel extension and various user-space libraries and tools. It comes with C-based and Objective-C based SDKs. If you prefer another language (say, Python or Java), you should be able to create file systems in those languages after you install the relevant language bindings yourself.

To see some examples of MacFUSE at work, see the videos linked on the right.

The MacFUSE source repository contains source code for several exciting and useful file systems for you to browse, compile, and build upon, such as sshfs, procfs, AccessibilityFS, GrabFS, LoopbackFS, SpotlightFS, and YouTubeFS.

NB: Please post all your MacFUSE-related questions and issues in the MacFUSE discussion forum. Do search to see if your question or problem is already discussed. You should also look at the MacFUSE wiki and thearchive of old issues.


[Productivity Power Tools]

개발생산성을 높여줍니다.!~

-> Ctrl+Alt+] –>


-> Ctrl + _comment 클릭 –>

선언 된데로 찾아간다

아래와 같이도 확인 할 수 있다.


토글 기능도 있따!.

막열어 제끼는 나한테 딱임 (아이콘으로 이게 UI인지 비하인드 코드인지도 쉽게 알수 있게 해놔따 )


다운로드 URL

http://visualstudiogallery.msdn.microsoft.com/d0d33361-18e2-46c0-8ff2-4adea1e34fef/


자동으로 모델링 해주는

[Feature Builder Power Tool]파워툴은  젤 상위버전에서만 설치 가능 ㅜ_ㅜ

http://visualstudiogallery.msdn.microsoft.com/67b720f4-9a50-41cb-86a2-82e33b7c5fc4/

Visual Studio 2010 Visualization and Modeling Tools Forum


생산성 향상 파워툴 동영상 참고
http://channel9.msdn.com/Blogs/MichaelLehman/Introduction-to-the-Feature-Builder-Power-Tool-for-Visual-Studio-2010

설명

Please note: If you are using Visual Studio 2010 SP1 you may need to uninstall previous versions of the Productivity Power Tools prior to upgrading due to a change in the digital signature for the Power Tools.

This update fixes several crashes that were encountered while using the Enhanced Scrollbar and Fix Mixed Tab Extensions.

Avoid Extension Resets

If you downloaded the February 2011 Productivity Power Tools, this build will be the first upgrade which will remember that you have disabled some extensions. The key thing to make sure that this is successful is to use the toast that notifies you about update extensions to install the updated Power Tools.

Find (New!)

There are many different ways to find within Visual Studio (Incremental Search, Quick Find, Find in Files, Find Toolbar, etc) and it often isn’t clear which is the best for a given task or worse these options even exist. The find dialog itself also can obstruct code and jump around while users are searching. Our solution to these problems is the new Find extension. In the screenshot below, you will see that we’ve turned the quick find & incremental search experiences into a find pop-up that is available at top right hand corner of the editor. After hitting, Ctrl+I or Ctrl+F, it simply highlights the find results as you type. From this small but powerful pop-up, you have access to most of the Quick Find functionality such as replace, options to match case and added support for matching .NET Regular Expressions!

Release notes:

  • As an extension, it was only possible to implement these changes for the code editor. You still must use Quick Find for searching in designers and other non-editor tabs.
  • .NET Regular expressions are only available in the Find extension. Find in Files will continue to use VS Regular expressions
  • Feel free to email us your feedback: VSFindFeedback@microsoft.com

Enhanced Scrollbar (New!)

We’ve been looking into ways that we can improve the experience of navigating through code files. Our solution is the source map which has three modes that will allow you to more easily see the interesting artifacts in your files (edits, breakpoints, bookmarks, errors, warnings etc) and make it easy for you to navigate between them. The default mode is the “scroll bar only mode” which overlays icons onto the standard scrollbar to allow for viewing of these artifacts. In the source map mode, we’ve replaced the default scroll bar allow you to click on any item on the scrollbar to navigate directly to it. This source map mode also provides a preview of the part of the document as you hover. Finally, we have the detailed source map mode, which allows you to get a zoom out view of your entire file. You can switch between any of these modes by right-clicking on the scroll bar or going to Tools Options>Productivity Power Tools>Source Map where we have a host of other options that you can configure.

Middle-Click Scrolling (New!)

The ability to do middle click scrolling in Visual Studio 2010 has been a top request from our beta customers that we weren’t quite able to get into the release. With this extension you can press down on your scroll wheel and the move the mouse to quickly scroll through your document!

Organize Imports for Visual Basic (New)

As part of the co-evolution strategy for Visual Basic and C#, we continue to bring the best features from each language experiences to the other. With Organize Imports for Visual Basic we’ve added yet another feature to that list. From the context menu, it allows you to sort the imports logically and remove the ones that aren’t being used.

Add Reference Support for Multi-Targeting (Updated)

“How come I can’t add a reference to System.Web?” Many users have scratched their heads trying to figure out why certain dlls aren’t showing up in the Add Reference dialog. The confusion has been caused by the logic in the Add Reference dialog which filters out assemblies that are not valid on the .NET Client Profile which many of Visual Studio templates target by default. The Productivity Power Tools solution is to grey out the assemblies which are not available in the current framework profile. When you try to add them, it will automatically prompt you to re-target to a profile of the same framework which does support them.

Options in HTML Cut/Copy (Updated)

Productivity Power Tool users have asked for the ability to tweak the html format which gets copied to the clipboard and with the release you now have the ability to customize that to suite your needs. Simply go to Tools Options>Productivity Power Tools> HTML Copy

This release of the extension also fixes the commonly reported bug where Cut/Copy occasionally fail which was fixed in VS 2010 SP1 Beta but was present in the October release of the Productivity Power Tools.

Solution Navigator

Solution Navigator is a new tool window that acts like an enhanced Solution Explorer. With it, you can:

  • Expand code files to navigate to its classes, expand classes to navigate to their members, and so on (C# and VB only)
  • Search your solution, all the way down to class members
  • Filter your solution or projects to see just opened files, unsaved files, and so on
  • View related information about classes and members (such as references or callers/callees for C#)
  • Preview images by hovering over them, or preview rich information by hovering over code items
  • We've also added support for multiple selection and drag & drop.

In other words, it merges functionality from Solution Explorer, Class View, Object Browser, Call Hierarchy, Navigate To, and Find Symbol References all into one tool window!
Solution Navigator also provides interactive tooltips in C# and VB code (replacing the default “quick info” tooltips) that give you the same kind of data, but right at your fingertips. In addition to getting the tooltips on hover, you can:

  • Press Ctrl+1 to open a relevant tooltip at the current cursor location
  • Press Ctrl+2 to quickly navigate to any class/member in the current source file

Tab Well UI (More Info)
This extension allows you to completely customize the behaviour of your document tabs from the Productivity Power Tools Options:

  • Floating Tab Wells
    Now you can dock floating document windows on a separate monitor just like tool windows! There’s also an option now which allows you to open documents as floating by default.
  • Scrollable tabs
    Maintain spatial consistency of the documents that are included in the document well.
  • Vertical tabs
    Document tabs are shown vertically, allowing you to fit more tabs than are normally visible when shown horizontally.
  • Pinned tabs
    Allows you to pin tabs to keep them always visible and available.
  • Show close button in tab well
    Similar to Visual Studio 2008, will show a close button in the document well that will close the active tab.
  • Tab Behavior
    • More Commands for Navigation
      Using Ctrl+Alt+Page Down and Page Up to navigate between tabs (including pinned) in visual order.
      Activate a specific pinned tab by Ctrl+Num Pad 1 through 0
      Activate a specific regular tab by Ctrl+Alt+Num Pad 1 through 0
      New commands for Moving windows between Tab groups (Window.MoveAllToNextTabGroup/Window.MoveAllToPreviousTabGroup)
    • Remove tabs by usage order (LRU)
      When a new tab is inserted and existing tabs don't fit in the document well, instead of removing the tab at the end of the well it will remove the least recently used tab. This ensures that frequently used tabs are readily available.
    • Show pinned tabs in a separate row/column
      Pinning tabs can quickly cause you to run out of space for regular tabs. The option allows you to always show pinned tabs in a separate row (or column, if displayed vertically) from regular tabs.
    • Sorting
      • Sort tabs by project
        Tabs will be sorted by the project they belong to, thus keeping them always together in the document tab well.
      • Sort tabs alphabetically
        Tabs will be sorted alphabetically. When Sort By Project is turned on, tabs will be sorted first by project and then alphabetically.
      • Sort tab well dropdown alphabetically
        The drop down menu at the right end of the document well is sorted alphabetically. This option allows ordering as the tabs are laid out in the document well.
  • Tab UI
    • Color tabs according to their project or according to regular expressions
      This option permits tabs to be colored according to the project they belong to. This is particularly useful when sorting tabs by project, as it allows you to immediately identify different groups of project documents.
      You can also configure regular expressions and assign a color to each one. If the name of a tab matches the configured regular expression, it will be colored with the assigned color.
  • Miscellaneous options that modify tab UI
    • Show document/toolwindow icon in tab
    • Show close button in tab
    • Modify dirty indicator style
      This option allows you to select from a set of different dirty indicators that you might prefer over the asterisk.
    • Modify minimum and maximum tab size
      Allows you to modify minimum and maximum tab size. Try setting minimum and maximum sizes to the same value, and you will have evenly spaced tabs.
    • Advanced Options
      We previously had 14 options configured only through registry keys, you can now find them in the Advanced Options button in Tools Options->Productivity Power Tools -> Document Tab Well -> General

Searchable Add Reference Dialog (More Info)
The new Add Reference dialog makes it faster and easier for you to find the reference that you are looking for and add it to your VB, C# or F# project. From the Solution Explorer, simply right click on the References node, select the Add Reference command to see the updated Add Reference Dialog.

Tools Options Support
The number one feature request by far has been the ability to turn off the individual extensions in the Productivity Power Tools. In this release, we’ve added an extension which adds a category to Tools Options which allows you to toggle the extensions on/off and provides a single place to find the options for a particular extension.


Quick Access (More Info)
Quick Access is a new tool window that allows users to search for and execute common tasks within the Visual Studio IDE. Not sure where a particular menu command is located? Want a quick way to create a new Silverlight project? By using Quick Access, you can efficiently find and execute common VS operations without taking your hands off the keyboard. Quick Access allows users to:

  • Execute Main Menu and Context Menu commands
  • Open the New Project Dialog with a specific Project Template selected
  • Show a tool window
  • Jump to a Visual Studio Options page
  • Navigate to an open document in your Tab Well
  • Create and execute a series of actions (task)

To use, press Ctrl+3 to launch Quick Access, type in your search term (e.g., “debug”), and press Enter on the desired result. If your search term returns too many results, continue pressing Ctrl+3 to cycle through each category of results.

Auto Brace Completion
Automatic Brace Completion improves the productivity of writing code by automatically inserting the closing code construct when the opening construct is typed for VB & C#. More specifically, this extension:

  • Supports the following constructs: (), {}, [], <>, “”, and ‘’.
  • Allows you to press <TAB> to navigate past the next enclosing brace
  • Allows you to automatically complete a statement in C# by inserting the closing semi-colon and moving you to the next line with SHIFT + ENTER

The extensions from the previous Producitivity Power Tools have been included and improved. See the revision notes at the end of this post:

Highlight Current Line
As the resolution of monitors increases, it’s becoming more difficult to find the caret in the code editor. The highlight current line extension makes it easy to find the caret by highlighting the line that the caret is on in the editor. You can even configure the default colour by changing the setting for “Current Line (Extension)” and “Current Line Inactive (Extension)” in Tools Options Fonts & Colors.

HTML Copy (More Info)
This extension provides support for the HTML Clipboard format when cutting or copying code from the editor. This means that you’ll no longer have to go fix up the formatting of your code when you paste it into a TFS bug form or any other HTML based control.

Triple Click
It’s never been easier to select a line of code from the mouse by simple triple-clicking anywhere on the line.

Fix Mixed Tabs
Some developers prefer tabs, others prefer spaces, and nobody likes mixing tabs & spaces. This extension promotes developer harmony by warning as they are open or save a file that has a mixture of tabs & spaces. The information bar also provides an easy way to fix the file to suit your preference.

Ctrl + Click Go To Definition
This extension gives the editor a web browser by adding clickable hyperlinks to symbols in your code as you hold down the Ctrl key.

Align Assignments
This extension is useful for making your code a little more readable by aligning the assignments when you type Ctrl+Alt+] such that it takes this:

Please note: This may conflict with your formatting settings. E.g. in C# you will need to disable: Tools->Options->Text Editor->C#->Formatting->Spacing->"Ignore spaces in declaration statements"

Move Line Up/Down Commands
This extension maps the Alt+Up Arrow & Alt+Down Arrow keys such that they will move the current line of code or the selected lines up and down through the editor.

Column Guides
Since Visual Studio 2002, there has been a not so secret registry key which allowed user to draw a vertical line in the code editor. This is very useful to remind developers that their full line of code or comments may not fit one a single screen. Thanks to this extension this feature has returned with UI configure it. Simply place the cursor at the appropriate column and select Add Guideline from the context menu

Colorized Parameter Help
This extension improves consistency with the editor by applying syntax highlighting to the contents of the Parameter Help window for C# &VB.
Please note: Syntax highlighting colors can be customized using the display items prefixed with “Signature Help” in the “Fonts and Colors” menu.

현재 제가 사용하는 프로그램이며 그 중 나름 유용한 프로그램 모음입니다. ㅎ


Parallels Desktop 6

windows 7을 맥os 안에서 가상으로 띄운다.  (윈도우즈의 VM웨어나 Windows7의 가상 XP 생각하면 됩니다.)

부트캠프로 왔따가따 안해도 되서 편함 ㅋ.

http://www.parallels.com/landingpage/pd6-vs-fusion/special-offer/ko/

image

(Mac os 에서 윈도우즈를 띄운상태)


아이폰으로 제어도 가능하다!!! ㅋ

http://www.parallels.com/mobile

image


image


App Tamer 1.0.5

CPU 등 자원많이 먹는것을 보고 제거 할 수 있따. 이렇게 해서라도 베터리 아껴야 하나 ㅡ_ㅡ

Introduction

App Tamer focuses your computing power and extends battery life

App Tamer tames applications that are chewing up excessive CPU time and battery life on your Mac. Some apps, especially web browsers and Adobe applications, continue running tasks or animations even when they're sitting idle in the background. App Tamer automatically pauses them instead, focusing your CPU on what's frontmost and extending battery life if you're working on a laptop.

AutoStop makes it easy

While some utilities will let you manually stop processes, App Tamer is unique with its "AutoStop" feature. This will stop an application when you switch away from it, and then automatically restart it when you click back to it or select it from the Dock. It's convenient enough that you can use it all the time.

A few clicks is all it takes

App Tamer includes a useful and clear user interface for managing running applications, showing the average percentage of your processor(s) used by each one. Just click the AutoStop checkbox next to an application to minimize its CPU and power consumption.

App Tamer comes pre-configured to automatically stop Safari, Firefox and Google Chrome after they've been in the background for more than 15 seconds.


A Better Finder Rename  파일네임 일괄 변경툴

http://www.publicspace.net/ABetterFinderRename/

Photographers in particular will find the advanced sequence number and date & time features a joy to behold. A Better Finder Rename knows how to extract EXIF shooting date and time information from your digital camera images and exploit them in creating sequence numbers or adding time and date information to the file name. Support for all major RAW formats (including JPEG, CRW, CR2, THM, NEF, TIFF, RAJ, ORF , MRW, DNG, PEF, SRF, etc.) extends this to professional photographers. Version 8 now also deals gracefully with multiple shots captured in the same second.

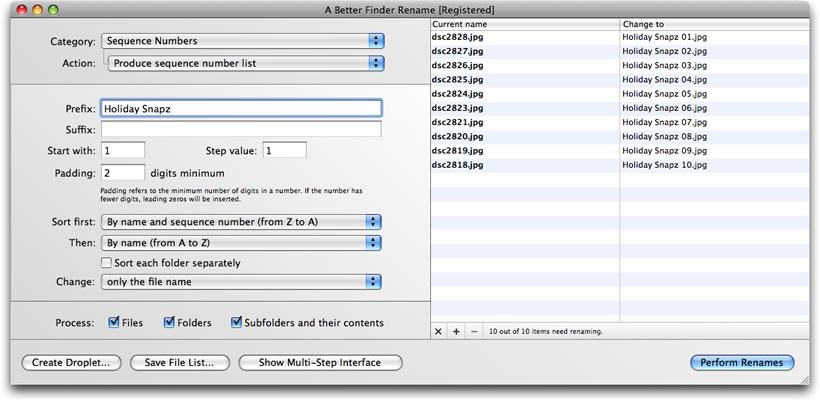
System administrators, web masters and other power users will appreciate the presence of advanced features, such as regular expression support, conversion to Windows NTFS/SMB compatible names, the ability to import file names from a database, a spreadsheet or any other source that can produce plain or tab-delimited text files. Finally, it allows you to save a record of the current and new file names to facilitate tracking your files.

Music lovers will be delighted by our MP3/AAC renaming feature that allows you to exploit the id3 meta-data tags embedded in your music files to create your own naming scheme for your music collection. Meta-data information from mp3, aac and iTunes music store files are supported.


Divvy

예는 아래 그림을 보면 네모블럭이 해상도라고 보고  블럭을 지정한 크기만큼

응용프로그램 사이즈가 잡힌다. 예를 들어 네모박스를 풀로 선택하면 전체화면이 된다.

http://itunes.apple.com/kr/app/divvy/id413857545?mt=12

스크린샷 1

스크린샷 5


DVDRemaster

DVD 에서 영상추출 비디오 아이팟, 아이팟 터치, 아이폰, 애플등에서 사용할수 있는 포멧으로 변환

DVDRemaster is an application which recompresses large DVDs so they can be burned on a standard DVD or converts them so they can be watched on your video iPod, iPod touch, iPhone, iPad, Apple TV and many others. DVDRemaster accommodates both novices and experts with its simple but yet powerful interface.


스크린샷 1


Mac DVDRipper Pro

DVD에서 영상 추출하는 프로그램

image

Hands Off!

프로그램의 네트워크 접속 상태등을 모니터링 할 수 있고 차단/허용도 가능함

image

Hands Off! is an application to monitor and control the access of applications to your network and disks. Being able to monitor the normally unnoticeable activities enables you to make informed decisions regarding the transfer of your private information, hence avoiding confidential information leakage.
When connected to the Internet, applications can send any information stored on your computer to whoever they want without you ever knowing. Using Hands Off!, you can monitor and control Internet connections from all applications as to expose hidden connections and prevent them from sending data or phoning home without your consent.
Applications present on your computer can freely read, store or erase information on your computer without your knowledge. Using Hands Off!, you can monitor and control disk access from all applications as to prevent them from obtaining confidential information, erasing your data or storing cookies.


1Password

걍 쉽게 알패스라 생각하면되는데 (이놈은 개인정보/신용카드/중요메모등 다 관리)

웹사이트 로그인정보관를 예를들면 네이버에 로그인창에서 로그인하면 로그인정보를 저장할껀지 물어보고 관리를 해준다.

관리를 선택하면 그다음부턴 버튼한번으로 로그인 계속 알패쓰를 써왔던지라 무지하게 좋다 ㅜㅜ

image


TechTool Pro

하드웨어의 상태를 점검 할 수 있고 복구까지 가능하다

Diagnostic & Repair: SMART test of the Mac’s built-in hard drive to check for impending drive failure, a test of the computer's available RAM, a check of the disk directories, and much more.
Volume Rebuild: Keeps your hard drives operating at their peak performance.
Optimization: Performs both file and volume optimization. File optimization consolidates each individual file into a contiguous area of the hard drive. Volume optimization consolidates the free space on a hard drive. Optimizing enhances the overall performance of your drives and simplifies the file storage layout.

image


image


숫자 바인딩 된 값을 금액형식으로 표시하기

Amount 는 숫자타입(int , flot 등등)이여야 합니다.

<TextBlock TextWrapping="Wrap" Text="{Binding Amount, StringFormat=\{0:N0\}}" TextAlignment="Right"/>


비하인드 코드에서 바인딩으로 금액표시 만들기


   /// 
    /// MainWindow.xaml에 대한 상호 작용 논리
    /// 
    public partial class MainWindow : Window
    {


        public int Amount { set; get; }
        Binding myBinding = new Binding("Amount");    

        public MainWindow()
        {
            InitializeComponent();


            myBinding.Source = this;
            myBinding.StringFormat = "{0:N0}";
            myBinding.UpdateSourceTrigger = UpdateSourceTrigger.PropertyChanged; //즉시업데이트
            //텍스트박스의 텍스트에 바인딩을 설정하겠다.
            this.textBox1.SetBinding(TextBox.TextProperty, myBinding); //
           
        }

        private void button1_Click(object sender, RoutedEventArgs e)
        {
           //myBinding.UpdateSourceTrigger 를  UpdateSourceTrigger.Explicit; 로 설정했을때 명시적으로 업데이트 시키기
            BindingExpression be = this.textBox1.GetBindingExpression(TextBox.TextProperty);
            be.UpdateSource();

        }
    }


image


딱 봐도 추천할만한 방법은 아니다. ! ㅋ

저렇게 하면 된다는정도만 알고 응용하시길… ㅜ_ㅜ

Microsoft Visual Studio 2010 Service Pack 1 (Installer)


비주얼스튜디오2010 서비스팩 1 이 나왔습니다. 다운로드 ㄱㄱ


다운로드

http://www.microsoft.com/downloads/ko-kr/details.aspx?FamilyID=75568aa6-8107-475d-948a-ef22627e57a5


개선된 점 보기

http://support.microsoft.com/kb/983509

기본적으로 하나의 행에 하나의 바인딩 밖에 안되므로;;;;
ConverterParameter 에 바인딩값을 넘길수가 없습니다.
그래서 멀티바인딩으로 값을 두개 가지고 IMultiValueConverter 에서 처리합니다.
<UserControl.Resources>
        <Com_ControlLibrary_Convert:SchoolConvertMultiBinding x:Key="SchoolConvertMultiBinding"/>

        <DataTemplate x:Key="SchoolNameDataTemplate">
            <Grid>
                <TextBlock HorizontalAlignment="Left" TextWrapping="Wrap"  >
                    <TextBlock.Text>
                     <MultiBinding Converter="{StaticResource SchoolConvertMultiBinding}">
                    <Binding Path="SchoolCode" /> 학교코드와 학교이름을 같이 넘긴다. 학교코드가 없으면 학교이름을 리턴
                    <Binding Path="SchoolName" />
                    </MultiBinding>
                  </TextBlock.Text>

                </TextBlock>
            </Grid>
        </DataTemplate>
    
    </UserControl.Resources>

SchoolConvertMultiBinding

class RemainingTimeConverter : IMultiValueConverter
    {
        #region IMultiValueConverter Members
        public object Convert(object[] values, Type targetType, object parameter, CultureInfo culture)
        {
            //values[0] is SchoolCode
            //values[1] is SchoolName
            throw new NotImplementedException();
        }
        public object[] ConvertBack(object value, Type[] targetTypes, object parameter, CultureInfo culture)
        {

                  string[] splitValues = ((string)value).Split(' ');
                  return splitValues;

        }
        #endregion
    }

+ Recent posts