GridView 데이터 바인딩 각각의 Row 에 데이터 바인딩

    protected void GridView1_RowDataBound(object sender, GridViewRowEventArgs e)
    {

        if (e.Row.RowType == DataControlRowType.DataRow)
        {

            System.Data.DataRowView drv = (System.Data.DataRowView)(e.Row.DataItem);
            int img_int = (int)drv["memo_read"];
            Control c = e.Row.FindControl("Image1");
            Control memoContent = e.Row.FindControl("LabelMemoContent");
            if (c != null)
            {
                if (img_int == 2)
                {
                    ((Image)c).ImageUrl = "img/img_16.jpg";
                }
                else {

                    ((Image)c).ImageUrl = "img/img_17.jpg";
                }              
            }

        }
    }

선택한 행의 데이터 키 값을 확인하는 방법 과 EditItemTemplate 에서 컨트롤의 값을 가져오기

(사용자작업일때)

다음 코드 예제에서는 DataKeys 속성을 사용하여 GridView 컨트롤에서 선택한 행의 데이터 키 값을 확인하는 방법을 보여 줍니다.

    protected void GridView1_RowUpdating(object sender, GridViewUpdateEventArgs e)
    {

 // 수정할려는 수정템플릿의 값을 가져오는 방법
        GridViewRow row = GridView1.Rows[e.RowIndex];

        TextBox CTextBoxbMove_url = (TextBox)row.FindControl("TextBoxbMove_url");

//GridView의 고유값을 가져오는 방법

//GridView 에서 DataKeyNames가 설정되어져있어야함

        int index = GridView1.SelectedIndex;

        Response.Write("e.Keys::: " + this.GridView1.DataKeys[e.RowIndex].Value );

//데이터베이스에 저장하기

    SqlConnection conn = new SqlConnection(AspxUtil.GetDBStr());
        conn.Open();
        SqlCommand comm = new SqlCommand("UPDATE SEARCH_BAR_TEXT_BANNER SET banner_text =@banner_text  ,move_url=@move_url WHERE IDX=@idx  ", conn);
        comm.Parameters.Add("@banner_text", SqlDbType.VarChar).Value = ((TextBox)row.FindControl("TextBoxbMove_url")).Text;
        comm.Parameters.Add("@move_url", SqlDbType.VarChar).Value = ((TextBox)row.FindControl("TextBoxbMove_url")).Text;
        comm.Parameters.Add("@idx", SqlDbType.Int).Value = this.GridView1.DataKeys[e.RowIndex].Value;
        comm.ExecuteNonQuery();

GridView1.DataBind();
        this.GridView1.EditIndex = -1;

    }

<asp:GridView ID="GridView1"

runat="server"

AutoGenerateColumns="False"              

DataKeyNames="idx"

OnRowUpdating="GridView1_RowUpdating"  

>

<asp:TemplateField HeaderText="banner_open" >

         <EditItemTemplate>
                    <asp:TextBox ID="TextBoxBanner_open" runat="server" Text='<%# Bind("banner_open") %>'></asp:TextBox>
         </EditItemTemplate>

<ItemTemplate>

리스트 뿌려줄때 그안에 속한 컨트롤 제어하기 DataBound

데이터가 바운드될때 dropDownList를 찾아서 데이터베이스에 저장된 값에 따라 셀렉트를 선택한다

    protected void GridView1_RowDataBound(object sender, GridViewRowEventArgs e)
    {
        if (e.Row.RowType == DataControlRowType.DataRow)
        {       

     //데이터값 가져오기
           DataRowView dr = (DataRowView)e.Row.DataItem;   

       //DropDownListBanner_open 이름의 컨트롤 찾기
           DropDownList dl = (DropDownList)e.Row.FindControl("DropDownListBanner_open");

//만약컨트롤이 있다면 selected 시키자
           if (dl != null){             
               dl.SelectedIndex = (int)dr["banner_open"];
            }

        }

    }

RowCommand 에서 데이터 접근하기

    protected void GridView1_RowCommand(object sender, GridViewCommandEventArgs e)
    {

            //컨트롤텍스트에 접근하기
            string m_id = this.GridView1.Rows[int.Parse(e.CommandArgument.ToString())].Cells[1].Text;

             //DataKeys 에 접근하기

            //Response.Write(this.GridView1.DataKeys[ int.Parse( e.CommandArgument.ToString() )  ].Value);

        }

<ItemTemplate>일때 접근방법

    protected void GridView1_RowCommand(object sender, GridViewCommandEventArgs e)
    {

            ImageButton btn = ((ImageButton)e.CommandSource);
            int row_num = (int)((GridViewRow)btn.Parent.Parent).RowIndex;

        }

DataSet 값 불러오기

 string sql = "SELECT * FROM TEST";
    //아답터 생성
    this._DataAdapter = new System.Data.OleDb.OleDbDataAdapter();
    

//아답터 쿼리가져오기
    _DataAdapter.SelectCommand = new System.Data.OleDb.OleDbCommand(sql , this._Conn );


    //데이터셋 만들기
    this._DataSet = new DataSet();


    //아답터 쿼리담기
    this._DataAdapter.Fill(this._DataSet );


    //테이블 만들기
    this._DataTable = this._DataSet.Tables[0];
   
    this._DataRowCollection = this._DataTable.Rows;


    //Get Data
    foreach (DataRow dr in this._DataRowCollection){      

        //필드안에 값 불러오기

         for(int i=0; i< _DataTable.Columns.Count; i++){          
            this.richTextBox1.Text += "\n"+dr[i];     
         }
     
    }


업데이트

    System.Data.DataRow row  = this._DataTable.NewRow();
   
    row["comm"] = "8";  
    _DataTable.Rows.Add(row);    

    
    string sqlstr ="insert into test(comm) values(?);"; 
  
    this._DataAdapter.InsertCommand = new System.Data.OleDb.OleDbCommand( sqlstr  , this._Conn ); 
    
    
    this._DataAdapter.InsertCommand.Parameters.Add("comm",System.Data.OleDb.OleDbType.VarChar ,50 , "comm" );
    
    this._DataAdapter.Update( this._DataSet );
    this.dataGrid1.DataSource =  this._DataSet.Tables[0];


  }

메소드 응용

public static SqlDataAdapter CreateCustomerAdapter(SqlConnection conn)
{
  SqlDataAdapter da = new SqlDataAdapter();
  SqlCommand cmd;

  // Create the SelectCommand.

  cmd = new SqlCommand("SELECT * FROM Customers " +
                       "WHERE Country = @Country AND City = @City", conn);

  cmd.Parameters.Add("@Country", SqlDbType.NVarChar, 15);
  cmd.Parameters.Add("@City", SqlDbType.NVarChar, 15);

  da.SelectCommand = cmd;

  // Create the InsertCommand.

  cmd = new SqlCommand("INSERT INTO Customers (CustomerID, CompanyName) " +
                       "VALUES (@CustomerID, @CompanyName)", conn);

  cmd.Parameters.Add("@CustomerID", SqlDbType.NChar, 5, "CustomerID");
  cmd.Parameters.Add("@CompanyName", SqlDbType.NVarChar, 40, "CompanyName");

  da.InsertCommand = cmd;

  return da;
}

Cheryl Simmons
Microsoft Corporation

2006년 8월

적용 대상:
Microsoft Visual Studio 2005
Microsoft .NET Framework 2.0
Microsoft Windows Forms

요약 : 바인딩된 데이터의 서식을 쉽게 지정할 수 있도록 지원하는 BindingControlBindingsCollection 클래스의 추가 기능에 대해 자세히 알아봅니다.

Microsoft 다운로드 센터 (영문)에서 C# 및 Visual Basic으로 작성된 코드 샘플을 다운로드하십시오(23KB).

목차

소개 소개
서식 지정 및 고급 바인딩 대화 상자 서식 지정 및 고급 바인딩 대화 상자
코드를 사용한 자동 서식 지정 코드를 사용한 자동 서식 지정
DataSourceUpdateMode 사용 DataSourceUpdateMode 사용
Null 및 DBNull 값 자동 처리 Null 및 DBNull 값 자동 처리
향상된 오류 및 예외 처리 향상된 오류 및 예외 처리
결론 결론

소개

Windows Forms 데이터 바인딩에 추가된 내용 중 가장 중요한 것은 아마도 BindingSource 구성 요소일 것입니다. BindingSource 구성 요소는 통화 관리, 변경 알림 및 바인딩된 목록에 있는 멤버에 대한 간편한 액세스 기능을 제공하여 개발자의 작업을 간소화해 줍니다. 한편, 데이터 바인딩에 추가된 몇 가지 기능은 잘 알려지지 않았지만 살펴볼 가치가 있으며 실제로 BindingSource 구성 요소에서 제공하는 기능을 보완하는 중요한 기능이 추가되었습니다.

Binding 개체는 .NET Framework 2.0에서 바인딩 작업에 대한 제어를 향상시키는 몇 가지 새로운 멤버를 갖고 있습니다. 예를 들어 데이터 원본이 업데이트될 경우 바인딩 컨트롤에서 데이터의 서식을 지정하는 방법과 데이터 원본에서 nullDBNull 값을 처리하는 방법을 제어할 수 있습니다. 이러한 새로운 멤버는 ControlBindingsCollection의 해당 Add 메서드에서도 지원됩니다. 이러한 추가 기능은 Visual Studio의 서식 지정 및 고급 바인딩 대화 상자를 사용하거나 코드를 통해 활용할 수 있습니다. 또한 BindingComplete 이벤트가 추가되어 Binding 개체는 바인딩 과정에서 발생할 수 있는 예외 및 오류 처리를 보다 효과적으로 지원할 수 있게 되었습니다. 이 문서에서는 BindingSource 구성 요소의 사용 여부에 관계없이 사용자의 응용 프로그램에서 활용할 수 있는 BindingControlBindingsCollection 개체의 이러한 변경 사항에 대해 설명합니다.

이 문서에서는 먼저 서식 지정 및 고급 바인딩 대화 상자에 대해 설명합니다. 그런 다음 코드를 사용하여 이 대화 상자에서 수행하는 것과 동일한 작업을 수행하는 방법에 대해 설명합니다. 처음 세 가지 예에서는 DataTable이 사용되고 네 번째 예에서는 BindingSource 개체가 사용됩니다. 모든 예에서 응용 프로그램의 데이터 원본으로 BindingSource를 사용할지 여부를 선택할 수 있지만 특히 동일한 데이터 원본에 대해 여러 컨트롤을 바인딩하는 경우에는 BindingSource를 사용하는 것이 좋습니다.

화면 맨 위로

서식 지정 및 고급 바인딩 대화 상자

Visual Studio에서 서식 지정 및 고급 바인딩 대화 상자를 사용하면 컨트롤 속성을 데이터 원본에 바인딩하고 결과의 서식을 지정할 수 있습니다. 이 대화 상자는 Binding 개체의 변경된 기능을 활용하도록 설계되었습니다. Visual Studio에서 서식 지정 및 고급 바인딩 대화 상자에 액세스하려면 데이터에 바인딩하려는 컨트롤을 마우스 오른쪽 단추로 클릭하고 속성을 선택합니다. 그림 1에 표시된 속성 창에서 (DataBindings) 항목을 확장하고 (고급) 항목을 선택합니다.

wfbindp101.gif

그림 1. 속성 창의 DataBindings 설정

(고급) 옆에 있는 줄임표 단추를 클릭하면 그림 2와 같은 서식 지정 및 고급 바인딩 대화 상자가 열립니다.

wfbindp102.gif

그림 2. 서식 지정 및 고급 바인딩 대화 상자

서식 지정 및 고급 바인딩 대화 상자에서는 응용 프로그램의 데이터 원본을 선택합니다. 데이터 원본은 BindingSource 개체, 데이터베이스 테이블, 웹 서비스 유형 또는 개체일 수 있습니다. BindingSource가 아닌 데이터 원본을 선택한 경우에는 해당 데이터 원본에 대한 BindingSource가 자동으로 생성됩니다. 그런 다음에는 컨트롤 값이 변경될 경우 데이터 원본을 업데이트하는 방법과 바인딩에 대한 서식 유형 및 Null 값을 설정할 수 있습니다.

참고 이 문서에서 설명하는 대부분의 작업은 서식 지정 및 고급 바인딩 대화 상자에서 수행할 수 있습니다.

화면 맨 위로

코드를 사용한 자동 서식 지정

이전 버전의 .NET Framework에서는 Binding 개체의 FormatParse 이벤트를 사용하여 형식 변환 및 서식 지정을 수동으로 수행해야 했습니다. 이제는 FormattingEnabled 속성을 직접 설정하거나 ControlBindingsCollectionAdd 메서드에 true를 전달하여 Binding 개체에 대한 서식 지정을 설정하면 됩니다. 또한 Add 메서드를 사용하거나 Binding 개체의 FormatString 속성을 설정하여 형식 문자열을 지정해야 합니다.

다음 코드에는 두 개의 서식 지정 예가 포함되어 있습니다. 첫 번째 서식 지정 예에서는 데이터 원본의 DateTime 값과 TextBox 컨트롤의 Text 값 간에 바인딩을 만드는 방법을 보여 줍니다. Binding 개체에서 FormattingEnabled 속성을 설정하고 FormatString 값은 DateTime에 자세한 날짜/시간 문자열 서식을 사용하도록 지정한 다음 컬렉션에 이 바인딩을 추가합니다.

두 번째 서식 지정 예에서는 DataTable의 데이터를 TextBox 컨트롤의 Text 속성에 바인딩하는 Binding 개체를 만들어 데이터의 서식을 지정하는 방법을 보여 줍니다. 고용 날짜 서식은 자세한 날짜로 지정하고 시작 급여 서식은 통화 단위로 지정합니다. 이 예에서는 ControlBindingsCollectionAdd 메서드를 사용하여 Binding 개체를 만듭니다. 또한 바인딩의 FormatString을 직접 설정합니다. 이 문서의 뒷부분에서는 ControlBindingsCollectionAdd 메서드를 사용하여 FormatString을 설정하는 방법을 설명합니다.

Dim table1 As New DataTable()
table1.Columns.Add("Name", GetType(String))
table1.Columns.Add("Hire Date", GetType(DateTime))
table1.Columns.Add("Starting salary", GetType(Integer))
table1.Rows.Add(New Object() {"Claus Hansen", New DateTime(2003, 5, 5), _   63000})
Dim dateBinding As New Binding("Text", table1, "Hire Date")
' Binding 개체에서 FormattingEnabled 및 FormatString을 직접 설정합니다.
' "D" 서식 지정자는 자세한 날짜 패턴을 나타냅니다.
dateBinding.FormattingEnabled = True
dateBinding.FormatString = "D"
' dateTextBox 바인딩 컬렉션에 바인딩을 추가합니다.
dateTextBox.DataBindings.Add(dateBinding)
' ControlBindingsCollection.Add 메서드의 
' 일부로 FormattingEnabled를 설정합니다.
Dim salaryBinding As Binding = salaryTextBox.DataBindings.Add("text", _   table1, "Starting Salary", True)
' "c" 서식 지정자는 통화 서식을 나타냅니다.
salaryBinding.FormatString = "c"
Dim nameBinding As Binding = nameTextBox.DataBindings.Add("Text", table1, _   "Name", True)

결과는 그림 3에 나와 있습니다.

wfbindp103.gif

그림 3. 서식 지정된 통화 및 날짜

화면 맨 위로

DataSourceUpdateMode 사용

DataSourceUpdateMode 열거형을 사용하면 컨트롤 속성의 변경 사항을 데이터 원본에 전파하는 시점을 지정할 수 있습니다. 기본값 DataSourceUpdateMode.OnValidation을 사용하면 사용자가 데이터가 바인딩된 값을 변경하고 Tab 키를 눌러 컨트롤에서 나올 때 데이터 원본이 업데이트됩니다. DataSourceUpdateNever를 사용하면 바인딩된 컨트롤의 변경된 값이 데이터 원본에 전파되지 않으며 OnPropertyChange를 사용하면 컨트롤 값이 변경될 때마다 변경된 값이 전파됩니다. OnPropertyChange 또는 OnValidation을 사용하는 경우 컨트롤 값이 유효성 검사를 통과하지 못하면 올바른 값을 입력하기 전에는 사용자가 Tab 키를 눌러 다른 컨트롤로 이동하거나 폼을 닫을 수 없습니다.

다음 예에서는 ControlBindingsCollectionAdd 메서드를 사용하여 DataSourceUpdateMode를 설정하는 방법을 보여 줍니다. DataTable의 고용 날짜는 고용 날짜 텍스트 상자의 내용이 변경될 때마다 업데이트됩니다. DataTable의 시작 급여는 시작 급여 텍스트 상자가 포커스를 잃고 값이 유효성 검사를 통과하면 업데이트됩니다. 시작 급여 텍스트 상자에 숫자가 아닌 잘못된 값(예: 하나 이상의 문자)을 입력하면 사용자는 Tab 키를 눌러도 텍스트 상자를 벗어날 수 없습니다.

Dim table1 As New DataTable()
table1.Columns.Add("Name", GetType(String))
table1.Columns.Add("Hire Date", GetType(DateTime))
table1.Columns.Add("Starting salary", GetType(Integer))
table1.Rows.Add(New Object() {"Claus Hansen", New DateTime(2003, 5, 5), _   63000})
' table1의 고용 날짜는 고용 날짜 텍스트 상자의 내용이 변경될 때
' 업데이트됩니다.
Dim dateBinding2 As Binding = dateTextBox.DataBindings.Add("Text", table1, _   "Hire Date", True, DataSourceUpdateMode.OnPropertyChanged)
dateBinding2.FormatString = "D"
' table1의 시작 급여는 시작 급여 텍스트 상자가
' 포커스를 잃고 값이 유효성 검사를 통과하면 업데이트됩니다.
Dim salaryBinding As Binding = salaryTextBox.DataBindings.Add("text", _   table1, "Starting salary", True, DataSourceUpdateMode.OnValidation)
salaryBinding.FormatString = "c"
Dim nameBinding As Binding = nameTextBox.DataBindings.Add("Text", table1, _   "Name", True)

화면 맨 위로

Null 및 DBNull 값 자동 처리

이전 버전의 Windows Forms 데이터 바인딩에서는 FormatParse 이벤트를 처리할 때 데이터 원본의 DBNull 또는 null 값을 컨트롤에서 어떻게 표시할지를 고려해야 했습니다. 이를 위해서는 데이터 원본의 특정 컨트롤 값을 구문 분석하여 null 또는 DBNull인지 확인할 수 있어야 했습니다. 이제는 Binding 개체의 NullValue 속성을 사용하여 이러한 작업을 훨씬 쉽게 수행할 수 있습니다.

다음 예에서는 데이터 원본의 DBNull 값을 NullValue 속성을 사용하여 바인딩된 컨트롤에 표시하는 방법을 보여 줍니다. 고용 날짜는 DataTable에서 DBNull 값이지만 텍스트 상자에는 "New Hire"로 표시됩니다.

Dim table1 As New DataTable()
table1.Columns.Add("Name", GetType(String))
table1.Columns.Add("Hire Date", GetType(DateTime))
table1.Columns.Add("Starting salary", GetType(Integer))
' 고용 날짜를 DBNull로 초기화합니다.
table1.Rows.Add(New Object() {"Claus Hansen", DBNull.Value, 63000})
' 고용 날짜가 Null 또는 DBNull인 경우 "New Hire"로 변경합니다.
Dim dateBinding2 As Binding = dateTextBox.DataBindings.Add("Text", table1, _   "Hire Date", True, DataSourceUpdateMode.OnValidation, "New Hire", "D")
Dim salaryBinding As Binding = salaryTextBox.DataBindings.Add("text", _   table1, "Starting salary", True)
salaryBinding.FormatString = "c"
Dim nameBinding As Binding = nameTextBox.DataBindings.Add("Text", table1, _   "Name", True)

결과는 그림 4에 나와 있습니다.

wfbindp104.gif

그림 4. "New Hire" 문자열로 서식이 지정된 DBNull

화면 맨 위로

향상된 오류 및 예외 처리

이제는 데이터 바인딩에 대한 서식 지정을 설정할 때마다 Binding 개체의 BindingComplete 이벤트를 사용하여 오류 및 예외 처리를 보다 효율적으로 제어할 수 있습니다.

다음 예에서는 바인딩된 컨트롤 값이 잘못된 값으로 변경된 경우 사용자에게 피드백을 제공하도록 BindingComplete 이벤트를 처리하는 방법을 보여 줍니다. 이 예에 사용된 Employee라는 비즈니스 개체는 Salary 속성에 20000 미만의 값을 사용하지 못하도록 합니다. 바인딩을 위해 Employee 개체는 BindingSource에 저장합니다.

여기에서는 먼저 BindingSource를 만들고 두 개의 Employee 개체를 추가한 다음 바인딩을 설정했습니다. 또한 BindingComplete 이벤트를 해당 이벤트 처리 메서드에 연결했습니다.

' Binding 개체를 선언합니다.
Dim WithEvents salaryBinding As Binding
Dim employeeBindingSource As New BindingSource()
employeeBindingSource.Add(New Employee("Hansen", "Claus", 63000, _   New DateTime(2002, 5, 5)))
employeeBindingSource.Add(New Employee("Han", "Mu", 54000, _   New DateTime(2001, 3, 4)))
nameTextBox.DataBindings.Add("Text", employeeBindingSource, _   "LastName", True)
dateTextBox.DataBindings.Add("Text", employeeBindingSource, _   "StartDate", True, DataSourceUpdateMode.OnValidation)
salaryBinding = salaryTextBox.DataBindings.Add("text", _   employeeBindingSource, "Salary", True, DataSourceUpdateMode.OnValidation, _   "Unknown", "c")

그런 다음 BindingComplete 이벤트를 처리합니다. 이 이벤트 처리기는 오류 메시지를 ErrorProvider 컨트롤에 전달합니다.

Sub salaryBinding_BindingComplete(ByVal sender As Object, _   ByVal e As BindingCompleteEventArgs) Handles salaryBinding.BindingComplete     ' BindingComplete 상태가 성공 이외인 경우     ' 오류 메시지에 대해 ErrorProvider를 설정합니다.     If e.BindingCompleteState <> BindingCompleteState.Success Then         errorProvider1.SetError( _           CType(e.Binding.BindableComponent, Control), e.ErrorText)     Else         errorProvider1.SetError( _           CType(e.Binding.BindableComponent, Control), "")     End If
End Sub

다음 코드는 Employee 비즈니스 개체를 보여 줍니다.

Public Class Employee     Private lastNameValue As String     Private firstNameValue As String     Private salaryValue As Integer     Private startDateValue As DateTime     Public Sub New(ByVal lastName As String, ByVal firstName As String, _       ByVal salary As Integer, ByVal startDate As DateTime)         lastNameValue = lastName         firstNameValue = firstName         salaryValue = salary         startDateValue = startDate     End Sub     Public Property LastName() As String         Get             Return lastNameValue         End Get         Set(ByVal value As String)             lastNameValue = value         End Set     End Property     Public Property FirstName() As String         Get             Return firstNameValue         End Get         Set             firstNameValue = value         End Set     End Property     Public Property Salary() As Integer         Get             Return salaryValue         End Get         Set             If value < 20000 Then                 Throw New Exception("Salary cannot be less than $20,000")             Else                 salaryValue = value             End If         End Set     End Property     Public Property StartDate() As DateTime         Get             Return startDateValue         End Get         Set             startDateValue = value         End Set     End Property     Public Overrides Function ToString() As String         Return LastName & ", " & FirstName & vbLf & "Salary:" _           & salaryValue & vbLf & "Start date:" & startDateValue     End Function
End Class

오류 처리가 이루어지는지 확인하려면 예제 코드를 실행하고 급여 값을 $20,000 미만의 값으로 변경해 보십시오. 그림 5는 BindingComplete 이벤트가 처리되어 사용자에게 피드백이 제공된 경우를 보여 줍니다.

wfbindp105.gif

그림 5. BindingComplete 이벤트를 사용하여 바인딩된 컨트롤의 데이터를 확인하는 예

뒷 이야기: .NET Framework 2.0에서 향상된 Windows Forms 데이터 바인딩 기술, 2부

Cheryl Simmons

Microsoft Corporation

2006년 8월

적용 대상:

Microsoft Visual Studio 2005

Microsoft .NET Framework 2.0

Microsoft Windows Forms

요약 : 제네릭 BindingList와 이 제네릭 컬렉션 형식을 확장하여 정렬 및 검색 기능을 추가하는 방법에 대해 자세히 알아봅니다.

Microsoft 다운로드 센터 (영문)에서 C# 및 Visual Basic으로 작성된 코드 샘플을 다운로드하십시오(29KB).

이 기사의 1부도 읽어 보십시오.

목차

소개 소개
제네릭 BindingList 정보 제네릭 BindingList 정보
코드 샘플 개요 코드 샘플 개요
제네릭 BindingList 검색 제네릭 BindingList 검색
제네릭 BindingList 정렬 제네릭 BindingList 정렬
다음 단계 다음 단계
소개 소개

소개

Windows Forms 데이터 바인딩의 새로운 기능 중 BindingSource 구성 요소는 가장 많은 주목을 받았습니다. 이 구성 요소는 통화 관리, 변경 알림 및 바인딩된 목록에 있는 멤버에 대한 간편한 액세스 기능을 제공하여 개발자의 작업을 간소화해 줍니다. 데이터 원본에 IBindingList 인터페이스와 검색 및 정렬 기능이 구현되어 있으면 BindingSource를 사용하여 데이터 원본을 검색하고 정렬할 수 있습니다. DataView 클래스는 IBindingList를 구현하는 형식 중 하나입니다. 그러나 IBindingList를 구현하는 클래스를 사용하지 않고 직접 IBindingList 인터페이스의 구현을 제공하여 사용자 지정 비즈니스 개체 목록을 만들고 바인딩해야 하는 경우도 있습니다. 이러한 경우를 위해 Microsoft .NET Framework에서는 TBindingList라고 하는 제네릭 BindingList 형식을 도입했습니다. 이 기사에서는 데이터 바인딩 응용 프로그램에서 제네릭 BindingList를 사용하여 검색 및 정렬이 가능한 사용자 지정 비즈니스 개체 목록을 제공하는 방법에 대해 설명합니다.

페이지 맨 위로

제네릭 BindingList 정보

제네릭 BindingListIBindingList 인터페이스의 제네릭 구현입니다. IBindingList 인터페이스는 Windows Forms 데이터 바인딩의 핵심 인터페이스인 IList 인터페이스의 확장입니다. IList 인터페이스에서 상속되는 기능 외에도 IBindingList를 구현하는 클래스는 정렬, 검색 및 변경 알림 기능을 선택적으로 지원할 수 있습니다. IBindingList 인터페이스는 상당히 복잡한 인터페이스이며 제네릭 BindingList 형식으로 제네릭 구현을 제공함으로써 Windows Forms 데이터 바인딩 엔진에 사용할 바인딩 가능한 사용자 지정 비즈니스 개체 목록을 훨씬 쉽게 작성할 수 있도록 해줍니다. 데이터 바인딩 시나리오에서 제네릭 BindingList를 사용하여 비즈니스 개체를 저장하는 경우 이 목록을 사용하면 항목을 쉽게 삽입 및 제거할 수 있으며 목록이 변경될 경우 변경 알림이 자동으로 제공됩니다. 또한 몇 가지 속성 및 메서드를 재정의하여 제네릭 BindingList에서 검색 및 정렬을 구현할 수 있습니다.

페이지 맨 위로

코드 샘플 개요

여기에서는 간단한 코드 샘플을 사용하여 데이터 원본에 검색 및 정렬 기능을 추가하는 방법을 설명하겠습니다. 몇 개의 Employee 개체가 포함된 목록이 있다고 가정해 보겠습니다. 목록에서 이름, 급여 및 입사 날짜별로 특정 직원을 검색하는 기능을 사용자의 응용 프로그램에 추가하려고 합니다. 응용 프로그램 사용자는 목록 검색 이외에도 이름, 급여, 고용 날짜별로 직원 목록을 정렬하는 기능을 원합니다. 이 예에서 볼 수 있듯이 DataGridView 컨트롤에 바인딩된 제네릭 BindingList에서 정렬 기능을 구현하면 추가 코드 없이도 DataGridView에서 정렬 기능을 제공할 수 있습니다.

Employee 비즈니스 개체 소개

이 코드 샘플에서는 간단한 Employee 비즈니스 개체가 사용됩니다. 다음은 Employee 형식의 구현입니다.

public class Employee
{     private string lastNameValue;     private string firstNameValue;     private int salaryValue;     private DateTime startDateValue;     public Employee()     {         lastNameValue = "Last Name";         firstNameValue = "First Name";         salaryValue = 0;         startDateValue = DateTime.Today;     }     public Employee(string lastName, string firstName,         int salary, DateTime startDate)     {         LastName = lastName;         FirstName = firstName;         Salary = salary;         StartDate = startDate;     }     public string LastName     {         get { return lastNameValue; }         set { lastNameValue = value; }     }     public string FirstName     {         get { return firstNameValue; }         set { firstNameValue = value; }     }     public int Salary     {         get { return salaryValue; }         set { salaryValue = value; }     }     public DateTime StartDate     {         get { return startDateValue; }         set { startDateValue = value; }     }     public override string ToString()     {         return LastName + ", " + FirstName + "\n" +         "Salary:" + salaryValue + "\n" +         "Start date:" + startDateValue;     }
}
제네릭 BindingList 확장

코드 샘플에서는 Employee 개체 목록에 대한 검색 및 정렬 기능을 구현하기 위해 BindingList를 기반으로 SortableSearchableList라는 이름의 형식을 만들었습니다. 검색 및 정렬을 구현하기 위해 재정의해야 하는 메서드 및 속성은 protected이기 때문에 제네릭 BindingList를 확장해야 합니다. 또한 클래스 선언에서 <T> 구문을 사용할 수 있도록 SortableSearchableList 형식을 제네릭 목록으로 만들도록 선택했습니다. 확장된 목록을 제네릭으로 만들면 여러 상황에서 이 목록을 다시 사용할 수 있습니다.

public class SortableSearchableList<T> : BindingList<T>

페이지 맨 위로

제네릭 BindingList 검색

제네릭 BindingList에서 검색을 구현하려면 여러 단계가 필요합니다. 우선 SupportsSearchingCore 속성을 재정의하여 검색이 지원됨을 나타내야 합니다. 그런 다음 검색을 수행하는 FindCore 메서드를 재정의해야 하며 마지막으로 검색 기능을 노출해야 합니다.

검색 지원 표시

SupportsSearchingCore 속성은 재정의해야 하는 읽기 전용 protected 속성입니다. SupportsSearchingCore 속성은 목록에서 검색이 지원되는지 여부를 나타냅니다. 기본적으로 이 속성은 false로 설정되어 있습니다. 목록에 검색이 구현되었음을 나타내려면 이 속성을 true로 설정합니다.

protected override bool SupportsSearchingCore{    get    {        return true;    }}
검색 기능 구현

그런 다음 FindCore 메서드를 재정의하고 목록을 검색하는 구현을 제공해야 합니다. FindCore 메서드는 목록을 검색하고 검색된 항목의 인덱스를 반환합니다. FindCore 메서드는 검색할 데이터 원본 형식의 속성 또는 열을 나타내는 PropertyDescriptor 개체와 검색할 값을 나타내는 키 개체를 받습니다. 다음 코드는 대/소문자를 구분하는 간단한 검색 기능을 구현한 것입니다.

protected override int FindCore(PropertyDescriptor prop, object key){    // 지정된 속성에 대한 속성 정보를 가져옵니다.     PropertyInfo propInfo = typeof(T).GetProperty(prop.Name);    T item;    if (key != null)    {        // 키 값이 속성 값과 일치하는지 확인하기 위해        // 루프로 항목을 조회합니다.         for (int i = 0; i < Count; ++i)        {            item = (T)Items[i];            if (propInfo.GetValue(item, null).Equals(key))                return i;        }    }    return -1;}
검색 기능 노출

마지막으로 공용 메서드를 사용하여 검색 기능을 노출하거나 기본 IBindingListFind 메서드를 사용하여 검색 기능을 호출할 수 있습니다. 검색 기능 호출을 단순화하기 위해 다음 코드에 나와 있는 공개적으로 노출된 Find 메서드는 검색할 문자열과 키를 받습니다. 그런 다음 코드는 속성 문자열을 PropertyDescriptor 개체로 변환하려고 시도합니다. 변환이 성공적이면 PropertyDescriptor와 키가 FindCore 메서드에 전달됩니다.

public int Find(string property, object key){    // 속성에서 지정한 이름의 속성을 확인합니다.     PropertyDescriptorCollection properties =         TypeDescriptor.GetProperties(typeof(T));    PropertyDescriptor prop = properties.Find(property, true);    // 일치하는 항목이 없으면 -1을 반환하고 그렇지 않으면    // FindCore 메서드로 검색을 전달합니다.     if (prop == null)        return -1;    else       return FindCore(prop, key);}

그림 1은 실행 중인 검색 기능을 보여 줍니다. 성을 입력하고 Search 단추를 클릭하면 검색된 항목이 있는 경우 표에서 해당 성이 나와 있는 첫 번째 행이 식별됩니다.

wfbindp201.gif

그림 1. 제네릭 BindingList 사용하여 구현된 검색 기능

페이지 맨 위로

제네릭 BindingList 정렬

응용 프로그램 사용자는 목록 검색 이외에도 이름, 급여, 고용 날짜별로 Employees 목록을 정렬하는 기능을 원합니다. SupportsSortingCore 속성과 ApplySortCoreRemoveSortCore 메서드를 재정의하여 제네릭 BindingList에서 정렬을 구현할 수 있습니다. 또한 선택적으로 SortDirectionCoreSortPropertyCore 속성을 재정의하여 정렬 방향 및 속성을 각각 반환할 수 있습니다. 마지막으로 목록에 추가된 새 항목이 정렬되도록 하려면 EndNew 메서드를 재정의해야 합니다.

정렬 지원 표시

SupportsSortingCore 속성은 재정의해야 하는 읽기 전용 protected 속성입니다. SupportsSortingCore 속성은 목록에서 정렬이 지원되는지 여부를 나타냅니다. 목록에 정렬이 구현되었음을 나타내려면 이 속성을 true로 설정합니다.

protected override bool SupportsSortingCore{    get { return true; }}
정렬 적용

그런 다음 ApplySortCore 메서드를 재정의하고 실제 정렬 세부 사항을 제공해야 합니다. ApplySortCore 메서드는 정렬할 목록 항목 속성을 식별하는 PropertyDescriptor 개체와 목록을 오름차순 또는 내림차순으로 정렬할지를 나타내는 ListSortDescription 열거를 사용합니다.

다음 코드에서는 선택한 속성에서 CompareTo 메서드를 제공하는 IComparable 인터페이스를 구현하는 경우에만 목록이 정렬됩니다. 문자열, 정수 및 DateTime 형식과 같은 대부분의 간단한 형식에서는 이 인터페이스가 구현됩니다. Employee 개체의 모든 속성이 간단한 형식이므로 이것은 합리적인 결정입니다. 또한 구현에서는 사용자가 간단한 형식이 아닌 속성으로 데이터 원본을 정렬하려고 시도하는 경우를 위해 간단한 오류 처리 기능을 제공합니다.

다음 코드에서는 RemoveSortCore 메서드에서 사용하기 위해 정렬되지 않은 목록의 복사본을 저장합니다. 그런 다음 지정된 속성의 값을 ArrayList에 복사합니다. ArrayList Sort 메서드에 대한 호출이 수행되며 이 메서드는 다시 해당 배열 멤버의 CompareTo 메서드를 호출합니다. 마지막으로 정렬된 배열의 값을 사용하여 정렬이 내림차순인지 또는 오름차순인지에 따라 제네릭 BindingList 값을 재구성합니다. 그런 다음 목록이 초기화되었음을 나타내는 ListChanged 이벤트가 발생하고 바인딩된 컨트롤의 값이 새로 고쳐집니다. 다음 코드는 정렬 기능을 구현한 것입니다.

ListSortDirection sortDirectionValue;
PropertyDescriptor sortPropertyValue;
protected override void ApplySortCore(PropertyDescriptor prop,     ListSortDirection direction)
{     sortedList = new ArrayList();     // 정렬 중인 속성 형식에서 IComparable 인터페이스가 구현되는지     // 확인합니다.     Type interfaceType = prop.PropertyType.GetInterface("IComparable");     if (interfaceType != null)     {         // 구현되는 경우에는 SortPropertyValue 및 SortDirectionValue를 설정합니다.         sortPropertyValue = prop;         sortDirectionValue = direction;         unsortedItems = new ArrayList(this.Count);         // 루프로 각 항목에 sortedItems ArrayList에 추가합니다.         foreach (Object item in this.Items) {             sortedList.Add(prop.GetValue(item));             unsortedItems.Add(item);         }         // ArrayList에서 Sort를 호출합니다.         sortedList.Sort();         T temp;         // 정렬 방향을 확인하고 정렬된 항목을 다시 목록에         // 복사합니다.         if (direction == ListSortDirection.Descending)             sortedList.Reverse();         for (int i = 0; i < this.Count; i++)         {             int position = Find(prop.Name, sortedList[i]);             if (position != i) {                 temp = this[i];                 this[i] = this[position];                 this[position] = temp;             }         }         // 바인딩된 컨트롤이 해당 값을 새로 고치도록 ListChanged 이벤트를         // 발생시킵니다.         OnListChanged(new ListChangedEventArgs(ListChangedType.Reset, -1));     }     else         // 속성 형식에서 IComparable이 구현되지 않으면 이를 사용자에게         // 알려 줍니다.         throw new NotSupportedException("Cannot sort by " + prop.Name +             ". This" + prop.PropertyType.ToString() +             " does not implement IComparable");
}
정렬 제거

다음 단계는 RemoveSortCore 메서드를 재정의하는 것입니다. RemoveSortCore 메서드는 목록에 적용된 마지막 정렬을 제거하고 목록이 초기화되었음을 나타내는 ListChanged 이벤트를 발생시킵니다. RemoveSort 메서드는 정렬 제거 기능을 노출합니다.

protected override void RemoveSortCore()
{     int position;     object temp;     // 목록이 정렬되었는지 확인합니다.     if (unsortedItems != null)     {         // 정렬되지 않은 항목에 대해 루프를 사용하고         // 정렬되지 않은 목록마다 목록을 다시 정렬합니다.         for (int i = 0; i < unsortedItems.Count; )         {             position = this.Find("LastName",                 unsortedItems[i].GetType().                 GetProperty("LastName").GetValue(unsortedItems[i], null));             if (position > 0 && position != i)             {                 temp = this[i];                 this[i] = this[position];                 this[position] = (T)temp;                 i++;             }             else if (position == i)                 i++;             else                 // 정렬되지 않은 목록에 항목이 더 이상 없으면                 // 이를 삭제합니다.                 unsortedItems.RemoveAt(i);         }         OnListChanged(new ListChangedEventArgs(ListChangedType.Reset, -1));     }
}
public void RemoveSort()
{     RemoveSortCore();
}
정렬 방향 및 속성 노출

마지막으로 prorected SortDirectionCoreSortPropertyCore 속성을 재정의합니다. SortDirectionCore 속성은 정렬 방향이 오름차순인지 또는 내림차순인지를 나타냅니다. SortPropertyCore 속성은 목록 정렬에 사용되는 속성 설명자를 나타냅니다.

ListSortDirection sortDirectionValue;PropertyDescriptor sortPropertyValue;protected override PropertyDescriptor SortPropertyCore{    get { return sortPropertyValue; }}protected override ListSortDirection SortDirectionCore{    get { return sortDirectionValue; }}
정렬 기능 노출

샘플에서는 Employees(SortableSearchableList)의 사용자 지정 제네릭 BindingListDataGridView 컨트롤에 바인딩하였습니다. DataGridView 컨트롤은 정렬이 구현되었는지 여부를 검색하는데 여기에서는 정렬이 구현되어 있기 때문에 DataGridView의 열을 클릭하면 DataGridView의 내용이 열 내용에 따라 오름차순으로 정렬됩니다. 열을 다시 클릭하면 항목이 내림차순으로 정렬됩니다. DataGridViewIBindingList 인터페이스를 통해 목록을 호출합니다.

검색 코드와 비슷하게 선택적으로 ApplySortCore를 호출하는 공용 메서드를 노출하거나 DataGridView 컨트롤과 비슷하게 기본 IBindingList를 호출할 수 있습니다.

((IBindingList)employees).ApplySort(somePropertyDescriptor,    ListSortDirection.Ascending);
목록에 추가된 항목의 정렬 보장

Employee 개체는 기본 생성자를 노출하므로 BindingListAllowNew 속성은 true를 반환하여 사용자가 목록에 직원을 추가할 수 있도록 합니다. 사용자가 새 항목을 추가할 수 있으므로 정렬이 적용된 경우에는 목록에 추가된 항목이 정렬된 순서에 맞게 추가되도록 해야 합니다. 이를 위해 EndNew 메서드를 재정의했습니다. 이 메서드 재정의에서는 SortPropertyValuenull이 아님을 확인하여 목록이 정렬되었음을 확인하고, 새 항목이 목록 끝에 추가되는지 확인(이 경우 목록을 다시 정렬해야 함)한 다음, 목록의 ApplySortCore를 호출합니다.

public override void EndNew(int itemIndex)
{     // 항목이 목록 끝에 추가되었는지 확인하고     // 목록 끝에 추가되었으면 목록을 다시 정렬합니다.     if (sortPropertyValue != null && itemIndex == this.Count - 1)         ApplySortCore(this.sortPropertyValue, this.sortDirectionValue);     base.EndNew(itemIndex);
}

그림 2는 실행 중인 정렬 기능을 보여 줍니다. DataGridView의 열을 클릭하면 내용이 정렬됩니다. Remove sort 단추를 클릭하면 마지막으로 적용된 정렬이 제거됩니다.

wfbindp202.gif

그림 2. 제네릭 BindingList 사용하여 구현된 정렬 기능

다음 단계

앞에서 설명한 대로 이 예는 제네릭 BindingList에서 검색 및 정렬 기능을 구현하는 방법을 보여 주는 간단한 샘플입니다. 이 샘플에서 사용하는 정렬 알고리즘은 IComparable 인터페이스를 구현하는 형식을 사용합니다. IComparable 인터페이스를 구현하지 않는 속성으로 정렬을 시도하면 예외가 발생합니다. 이 논리는 속성이 주로 간단한 형식인 사용자 지정 비즈니스 개체를 정렬하는 경우에 사용할 수 있습니다. 이 샘플의 기능을 향상시키려면 사용자 지정 비즈니스 개체에서 복잡한 형식을 갖는 모든 속성에 대해 IComparable 인터페이스를 구현하는 방법을 고려할 수 있습니다. 예를 들어 Employee 개체에 복잡한 Address 형식의 Address 속성이 포함된 경우 Address 형식을 정렬하기 위한 비즈니스 규칙을 결정하고(거리 이름, 번지 등) 적절하게 Address 형식에서 IComparable 인터페이스 및 CompareTo 메서드를 구현해야 합니다.

또한 목록 끝에 새 항목이 추가될 경우에는 목록이 자동으로 다시 정렬됩니다. 응용 프로그램의 비즈니스 논리에 따라 항목이 추가되는 위치에 관계없이 목록을 다시 정렬하도록 할 수도 있습니다.

마지막으로 데이터 원본에 필터링 및 다중 열 정렬 기능을 추가할 수도 있습니다. 이 경우에는 데이터 원본에 대한 IBindingListView 인터페이스를 구현할 것을 고려해 봅니다.

결론

BindingSource 구성 요소는 Windows Forms 데이터 바인딩에 추가된 매우 유용한 기능입니다. 그러나 사용자 지정 비즈니스 개체의 목록을 사용할 때는 검색 및 정렬 기능을 추가해야 할 경우가 있습니다. 새로운 제네릭 BindingList는 검색 및 정렬이 지원되는 사용자 지정 비즈니스 개체의 바인딩 목록을 보다 간단하게 만들 수 있게 해 줍니다. 이러한 기능 및 Windows Forms의 다른 기능에 대한 자세한 내용은 다음을 참조하십시오.

http://www.microsoft.com/korea/msdn/library/ko-kr/UseRequest_Filtering/html/default.aspx

요청 필터링 사용 방법


역자 : 송원석 IIS MVP

• IIS 관리 자동화 전문가
• ASP.NET 을 기반의 리치 웹 응용 프로그램 개발 전문가
• 전자조달 솔루션 전문 구축 업체 코어베이스 재직중
• 개인 사이트 에고큐브 (www.egocube.pe.kr) 운영중
• Taeyo`s ASP & .NET 커뮤니티(www.taeyo.pe.kr) 활동중


서론

URLScan 은 이전 버전의 IIS 에 애드-온 형태로 제공되던 보안 도구로 관리자들은 이 도구를 사용하여 웹 서버에 엄격한 보안 정책을 적용할 수 있었습니다. IIS 7.0 에서는 URLScan 의 모든 핵심적인 기능들이 요청 필터링이라는 모듈에 병합되었으며 숨겨진 네임스페이스라는 기능이 추가되었습니다. 본문에서는 요청 필터링이 제공하는 각각의 기능들에 대해서 알아보고 여러분들이 접하고 있는 환경에 적용이 가능하도록 실제 상황에서의 예제를 살펴보겠습니다.


페이지 맨 위로

이중 인코딩 요청 필터링

기능 개요

이 기능은 이중 인코딩된 요청을 이용한 공격을 방지합니다. 이 시나리오는 공격자가 주의 깊게 만들어진 이중으로 인코딩된 교묘한 요청을 IIS 로 전송하는 경우에 적용됩니다. 이와 같은 공격이 발생한다면 IIS 는 요청이 유효한 경우에만 허용하고 그렇지 않다면 거부할 것입니다. 이 기능이 활성화되면 IIS 는 해당 URL 을 두 번 디코딩하는데, 만약 첫 번째 디코딩 결과와 두 번째 디코딩 결과가 다르다면 요청은 거부되어질 것입니다. 이 기능에 의해서 요청이 거부되면 404.11 오류 코드가 로그에 기록됩니다.

URLScan 의 동일한 기능

이 기능은 URLScan 의 VerifyNormalization 옵션의 기능과 동일합니다.

실제 예제

이 예제에서는 서버 관리자가 서버로 전송되는 이중으로 인코딩된 요청을 결코 허용하지 않기를 원한다고 가정합니다. 이 시나리오를 반영하기 위해 다음과 같은 구성설정을 사용할 수 있습니다.

<configuration>
    <system.webServer>
        <security>
            <requestFiltering allowDoubleEscaping="false"></requestFiltering>
        </security>
    </system.webServer>
</configuration>

페이지 맨 위로

최상위 비트 설정 문자 필터링

기능 개요

이 기능은 IIS 로 전달되는 비 ASCII 문자가 포함된 모든 요청들을 허용할지 또는 거부할지를 결정합니다. 이 기능에 의해서 요청이 거부되면 404.12 오류 코드가 로그에 기록됩니다.

URLScan 의 동일한 기능

이 기능은 URLScan 의 AllowHighBitCharacters 옵션의 기능과 동일합니다.

실제 예제

이 예제에서는 서버 관리자가 전체 서버에 전송되는 최상위 비트가 설정된 문자들을 허용하지 않기를 바라지만, 오직 하나의 응용 프로그램에서는 이를 허용하기 원한다고 가정합니다. 이를 위해서 서버 관리자는 applicationHost.config 파일에는 allowHighBitCharacters=”false” 를 설정했지만, 비 ASCII 문자를 받아들이기 바라는 응용 프로그램의 루트 아래에는 web.config 파일을 생성했습니다. 다음의 구성설정이 바로 그 web.config 파일에 사용된 설정입니다.

 <configuration>
    <system.webServer>
        <security>
            <requestFiltering allowHighBitCharacters="true"></requestFiltering>
        </security>
    </system.webServer>
</configuration>

페이지 맨 위로

파일 확장자에 기반한 필터링

기능 개요

이 기능은 IIS 가 서비스 할 수 있는 파일 확장자들의 집합을 정의합니다. 이 기능에 의해서 요청이 거부되면 404.7 오류 코드가 로그에 기록됩니다.

URLScan 의 동일한 기능

이 기능은 URLScan 의 AllowExtensions 옵션과 DenyExtensions 옵션의 기능과 동일합니다.

실제 예제

이 예제에서는 서버 관리자가 ASP 파일은 서비스 되지 않지만 그 외의 모든 파일들은 서비스 되기를 원한다고 가정합니다. 이를 위해서 서버 관리자는 allowUnlisted 옵션을 “true” 로 설정하고, 명시적으로 서비스 되지 않기를 바라는 ASP 파일을 위해 다음과 같은 파일 확장자 항목을 정의합니다.

 <configuration>
    <system.webServer>
        <security>
            <requestFiltering>
                <fileExtensions allowUnlisted="true" >
                    <add fileExtension=".asp" allowed="false" />
                </fileExtensions>
            </requestFiltering>
        </security>
    </system.webServer>
</configuration>

페이지 맨 위로

요청 제한에 기반한 필터링

기능 개요

이 기능은 다음 세 가지 기능들의 조합으로 이루어집니다.

  • maxAllowedContentLength ? Content-Length 요청 헤더값의 최대 크기를 지정합니다.
  • maxUrl ? 쿼리스트링을 제외한 URL 의 최대 길이를 지정합니다.
  • maxQueryString ? 쿼리스트링의 최대 길이를 지정합니다.

이 기능에 의해서 요청이 거부되면 다음과 같은 오류 코드가 로그에 기록됩니다.

  • 404.13 콘텐츠가 너무 큰 경우
  • 404.14 URL 이 너무 긴 경우
  • 404.15 쿼리스트링이 너무 긴 경우
URLScan 의 동일한 기능

이 각각의 기능들은 URLScan 의 다음 기능들과 동일합니다.

  • maxAllowedContentLength
  • maxUrl
  • maxQueryString
실제 예제

이는 소스 코드에 접근할 수 없는 소프트웨어를 구매하는 기업들에게는 매우 일반적인 상황입니다. 코드에 내제된 취약성들이 발견되었을 때, 그 영향을 받는 코드를 갱신하는 것이 매우 어려울 수도 있습니다. 이러한 취약성들은 대부분 응용 프로그램으로 전송되는 URL 이나 쿼리스트링이 단지 ‘너무 커서’ 또는 ‘콘텐츠가 너무 많아서’ 발생하는 경우가 대부분입니다. 서버 관리자가 안전한 최대값을 결정할 수 있다면, 응용 프로그램의 이진 파일들을 수정하지 않고서도 아래와 같은 구성설정을 사용해서 그 제한값을 적용할 수 있습니다.

 <configuration>
    <system.webServer>
        <security>
            <requestFiltering>
                <requestLimits
                    maxAllowedContentLength="30000000"
                    maxUrl="260"
                    maxQueryString="25" />
            </requestFiltering>
        </security>
    </system.webServer>
</configuration>

페이지 맨 위로

HTTP 동사 필터링

기능 개요

이 기능은 IIS 가 요청으로 받아들일 동사들의 목록을 정의할 수 있게 해줍니다. 이 기능에 의해서 요청이 거부되면 404.6 오류 코드가 로그에 기록됩니다.

URLScan 의 동일한 기능

이 기능은 URLScan 의 UseAllowVerbs 옵션, AllowVerbs 옵션, 그리고 DenyVerbs 옵션의 기능과 동일합니다.

실제 예제

이 예제에서는 서버 관리자가 오직 하나의 동사, 즉 GET 동사만 허용하기를 원한다고 가정합니다. 이를 위해서 서버 관리자는 먼저 구성설정 파일에 allowUnlisted=”false” 옵션을 설정하여 명시적으로 지정하지 않은 모든 동사를 허용하지 않도록 설정합니다. 그리고, 그 다음에 허용하고자 하는 동사들의 목록을 명시적으로 지정합니다. 이 예제에서는 오직 GET 동사만을 허용합니다.

 <configuration>
    <system.webServer>
        <security>
            <requestFiltering>
                <verbs allowUnlisted="false">
                    <add verb="GET" allowed="true" />
                </verbs>
            </requestFiltering>
        </security>
    </system.webServer>
</configuration>

페이지 맨 위로

URL 문자열 시퀀스에 기반한 필터링

가능 개요

이 기능은 IIS 가 거부할 문자열 시퀀스의 목록을 정의합니다. 이 기능에 의해서 요청이 거부되면 404.5 오류 코드가 로그에 기록됩니다.

URLScan 의 동일한 기능

이 기능은 URLScan 의 DenyUrlSequences 옵션의 기능과 동일합니다.

실제 예제

이 기능은 매우 강력합니다. 만약 IIS 에 의해 서비스 되지 않기를 바라는 어떤 문자열 시퀀스가 있다면, 그 문자열 시퀀스를 다음과 같이 구성설정에 추가할 수 있습니다.

 <configuration>
   <system.webServer>
      <security>
         <requestFiltering>
            <denyUrlSequences>
               <add sequence=".." />
            </denyUrlSequences>
         </requestFiltering>
      </security>
   </system.webServer>
</configuration>

이 예제에서는 ‘..’ 시퀀스를 거부합니다. 그러나, 보다 현실적인 시나리오는 여러분들이 이미 폐업한 판매자로부터 구매한 응용 프로그램을 갖고 있으며, 특수한 시퀀스의 문자열이 이 응용 프로그램으로 전송되었을 때 문제가 발생할 수 있다는 사실을 발견한 경우입니다. 여러분들은 이 기능을 사용하여 해당 응용 프로그램의 코드를 수정하지 않고서도 단순히 거부 목록에 URL 시퀀스를 추가하는 것만으로 응용 프로그램을 보호할 수 있습니다.


페이지 맨 위로

숨겨진 네임스페이스 필터링

기능 개요

이 기능은 ‘서비스 가능한’ 네임스페이스를 (또는 URL 구역) 정의할 수 있도록 해줍니다. 이 기능에 의해서 요청이 거부되면 404.8 오류 코드가 로그에 기록됩니다.

URLScan 의 동일한 기능

이 기능은 IIS 7.0 에서 새롭게 제공되는 기능으로 URLScan 에는 존재하지 않습니다.

실제 예제

이해를 돕기 위해서 서버에 다음과 같은 두 개의 URL 이 존재하는 경우의 예제를 생각해 보겠습니다.

  • http://site.com/bin
  • http://site.com/binary

우리들이 원하는 것은 binary 디렉터리의 콘텐츠들은 서비스를 허용하지만 bin 디렉터리의 콘텐츠들은 서비스를 허용되지 않는 것입니다. 그렇지만, 만약 URL 시퀀스 필터링 기능을 사용하여 “bin” 시퀀스를 거부하도록 설정한다면, 결국 두 개의 URL 이 모두 거부되고 말 것입니다. 다음과 같은 구성설정을 사용하여 오직 bin 디렉터리에 대한 접근만을 거부하고 binary 디렉터리 하위에 존재하는 콘텐츠에 대한 접근은 계속해서 허용하도록 지정할 수 있습니다.

 <configuration>
    <system.webServer>
        <security>
            <requestFiltering>
                <hiddenNamespaces>
                    <add hiddenDirectory="BIN" />
                </hiddenNamespaces>
            </requestFiltering>
        </security>
    </system.webServer>
</configuration>

페이지 맨 위로

요약

이전 버전의 IIS 에서 관리자들은 URLScan 을 사용하여 전역적인 수준의 보안 정책을 정의하고 자신들이 관리하는 시스템에 이를 적용할 수 있었습니다. IIS 7.0 에서 관리자들은 전역적인 수준뿐만 아니라 각각의 URL 들을 대상으로 동일한 정책을 적용할 수 있게 되었으며, 새롭고 풍부한 기능의 대체 모델이 제공하는 이점들을 이용할 수도 있습니다.

본문을 통해서 우리들은 요청이 거부될 때 요청 필터링이 리턴하는 몇 가지 새로운 오류 코드를 살펴보았습니다. 다음은 모든 IIS 로그 오류 코드를 정리한 간단한 참조 목록입니다.

오류

상태 코드

요청된 포트에서 웹 사이트에 액세스할 수 없습니다.

404.1

웹 서비스 확장 잠금 정책으로 인해 이 요청이 거부됩니다.

404.2

MIME 맵 정책으로 인해 요청이 거부됩니다.

404.3

핸들러가 존재하지 않습니다.

404.4

요청 필터링: URL 시퀀스로 인해 요청이 거부됩니다.

404.5

요청 필터링: HTTP 동사로 인해 요청이 거부됩니다.

404.6

요청 필터링: 파일 확장자로 인해 요청이 거부됩니다.

404.7

요청 필터링: 숨겨진 네밍스페이스로 인해 요청이 거부됩니다.

404.8

숨겨진 파일 속성이 설정되어 요청이 거부됩니다.

404.9

요청 필터링: 요청 헤더가 너무 길어서 요청이 거부됩니다.

404.10

요청 필터링: 이중 인코딩된 URL 로 인해 요청이 거부됩니다.

404.11

요청 필터링: 비 ASCII 문자로 인해 요청이 거부됩니다.

404.12

요청 필터링: 콘텐츠 길이가 너무 커서 요청이 거부됩니다.

404.13

요청 필터링: URL 이 너무 길어서 요청이 거부됩니다.

404.14

요청 필터링: 쿼리스트링이 너무 길어서 요청이 거부됩니다.

404.15


  • 이 문서는 한국 개발자를 위하여 Microsoft MVP가 번역하여 제공한 문서입니다.
  • Microsoft는 이 문서를 번역자의 의도대로 제공해 드리며 더 정확한 표현 또는 여러분의 의견을 환영합니다.
  • Microsoft는 커뮤니티를 위해 번역자의 의도대로 이 문서를 제공합니다. 

    [출처] 요청 필터링 사용 방법 (II7) ,sql 인젝션 방지|작성자 스토커

  •  


    중첩마스터 페이지에서 컨트롤 찾아가기

    부모마스터페이지( MasterPage.master )

         ㄴ자식마스터페이지 (MasterPage03.master)

                       ㄴAspx Content Page (Default3.aspx)


    MasterPage.master  컨텐츠 영역

    <asp:ContentPlaceHolder ID="ContentPlaceHolderContent" runat="server"> 
    </asp:ContentPlaceHolder>

    MasterPage03.master

    <asp:Content ID="Content4" ContentPlaceHolderID="ContentPlaceHolderContent" Runat="Server">
        <asp:ContentPlaceHolder ID="ContentPlaceHolderContent" runat="server">

        </asp:ContentPlaceHolder>
    </asp:Content>

    Default3.aspx

    <asp:Content ID="Content1" ContentPlaceHolderID="ContentPlaceHolderContent" Runat="Server">
         <asp:TextBox ID="TextBox1" runat="server"></asp:TextBox>
    </asp:Content>

    Default3.aspx에서 컨트롤 접근하기

    protected void Page_Load(object sender, EventArgs e)
    {

    //부모 * 젤 상위 부터 찾아 내려옵니다.

    ContentPlaceHolder content = this.Master.Master.FindControl("ContentPlaceHolderContent") as ContentPlaceHolder;

    //부모를 상속받아 구현한 마스터페이지 찾기
        ContentPlaceHolder sub_content = content.FindControl("ContentPlaceHolderContent") as ContentPlaceHolder;
        TextBox txt =  sub_content.FindControl("TextBox1") as TextBox;
        if (txt != null)
        {
            Response.Write(txt.ClientID.ToString());
        }
        else {
            Response.Write("컨트롤 못찾음");
        }

    }


    끝~

    마스터페이지에서는 접근이 바로 안됩니다.

    한단계 더 통해서 접근이 가능합니다.


    마스터페이지

    <%@ Master Language="C#" AutoEventWireup="true" CodeFile="MasterPage.master.cs" Inherits="MasterPage" %>

    <!DOCTYPE html PUBLIC "-//W3C//DTD XHTML 1.0 Transitional//EN" "http://www.w3.org/TR/xhtml1/DTD/xhtml1-transitional.dtd">

    <html xmlns="http://www.w3.org/1999/xhtml">
    <head runat="server">
        <title></title>
        <asp:ContentPlaceHolder id="head" runat="server">
        </asp:ContentPlaceHolder>
    </head>
    <body>
    maseter page
        <form id="form1" runat="server">
        <div>
            <br />
            <asp:ContentPlaceHolder id="ContentPlaceHolder1" runat="server">
            </asp:ContentPlaceHolder>
        </div>
        </form>
    </body>
    </html>


    마스터페이지로 만들어진 컨텐츠 페이지

    <%@ Page Title="" Language="C#" MasterPageFile="~/MasterPage.master" AutoEventWireup="true" CodeFile="Default6.aspx.cs" Inherits="Default6" %>

    <asp:Content ID="Content1" ContentPlaceHolderID="head" Runat="Server">
    </asp:Content>
    <asp:Content ID="Content2" ContentPlaceHolderID="ContentPlaceHolder1" Runat="Server">

    <asp:FileUpload ID="FileUpload2" runat="server" />

    <br />
    <asp:Button ID="Button1" runat="server" onclick="Button1_Click" Text="Button" />
    <br />
    <br />
    </asp:Content>


    접근하기


    protected void Page_Load(object sender, EventArgs e)
    {

        ContentPlaceHolder content = this.Master.FindControl("ContentPlaceHolder1") as ContentPlaceHolder;
        if (content != null)
        {

            FileUpload fu = content.FindControl("FileUpload2") as FileUpload;
            if (fu != null) {

                Response.Write(fu.ClientID);
            }
        }
    }

    출처 : http://weblogs.asp.net/scottgu/archive/2009/01/27/asp-net-mvc-1-0-release-candidate-now-available.aspx


    ASP.NET MVC 1.0 Release Candidate Now Available

    Today we shipped the ASP.NET MVC 1.0 Release Candidate (RC).  Click here to download it (note: the link just went live so if it isn’t working wait a few minutes for the server you are hitting to refresh).  It works with both Visual Studio 2008 and Visual Web Developer 2008 (which is free).

    Today’s RC is the last public release of ASP.NET MVC that we’ll ship prior to the final “1.0” release.  We expect to ship the final ASP.NET MVC 1.0 release next month.

    In addition to bug fixes, today’s build includes several new features.  It also includes some refinements to existing features based on customer feedback.  Please read the release notes that ship with the ASP.NET MVC download for full details on all changes.  The release notes include detailed instructions on how to upgrade existing applications built with the ASP.NET MVC Beta to the RC.

    Visual Studio Tooling Improvements

    The RC includes several new Visual Studio tooling features (above and beyond the existing support in the beta – which I won’t cover here).  These features include:

    Add Controller Command

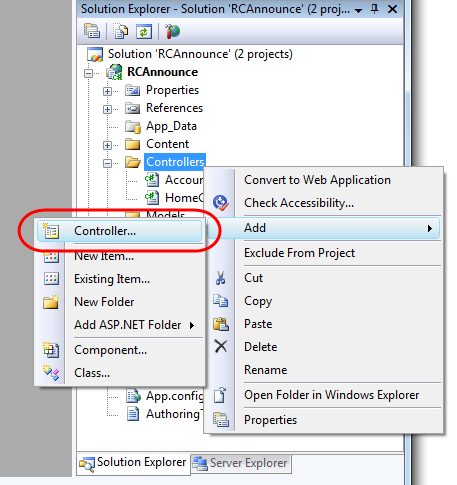
    You can now type Ctrl-M, Ctrl-C within an ASP.NET MVC project, or right-click on the /Controller folder and choose the “Add->Controller” context menu item to create new controller classes:

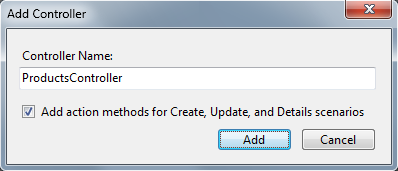
    This will cause an “Add Controller” dialog to appear that allows you to name the Controller to create, as well as optionally indicate whether you wish to automatically “scaffold” common CRUD methods:

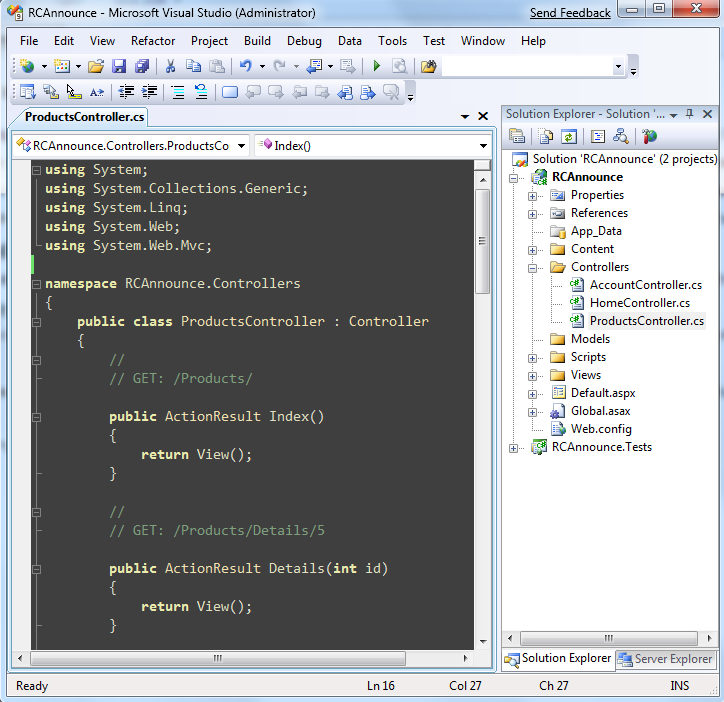
    Clicking the “Add” button will cause the controller class to be created and added to the project:

    Add View Command

    You can now type Ctrl-M, Ctrl-V within a Controller action method, or right-click within an action method and choose the “Add View” context menu item to create new view templates:

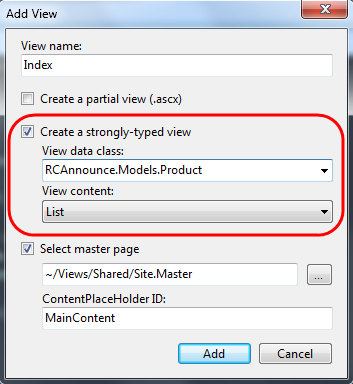
    This will cause an “Add View” dialog to appear that allows you to name and create a new view (it is pre-populated with convention-based options).  It allows you to create “empty” view templates, or automatically generate/scaffold view templates that are based on the type of object passed to the view by the Controller action method.  The scaffolding infrastructure uses reflection when creating view templates – so it can scaffold new templates based on any POCO (plain old CLR object) passed to it.  It does not have a dependency on any particular ORM or data implementation.

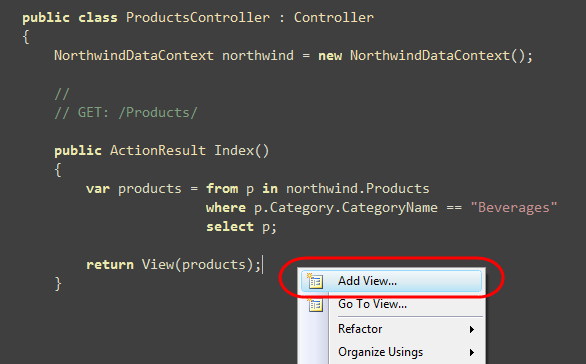
    For example, below we are indicating that we want to scaffold a “List” view template based on the sequence of Product objects we are passing from our action method above:

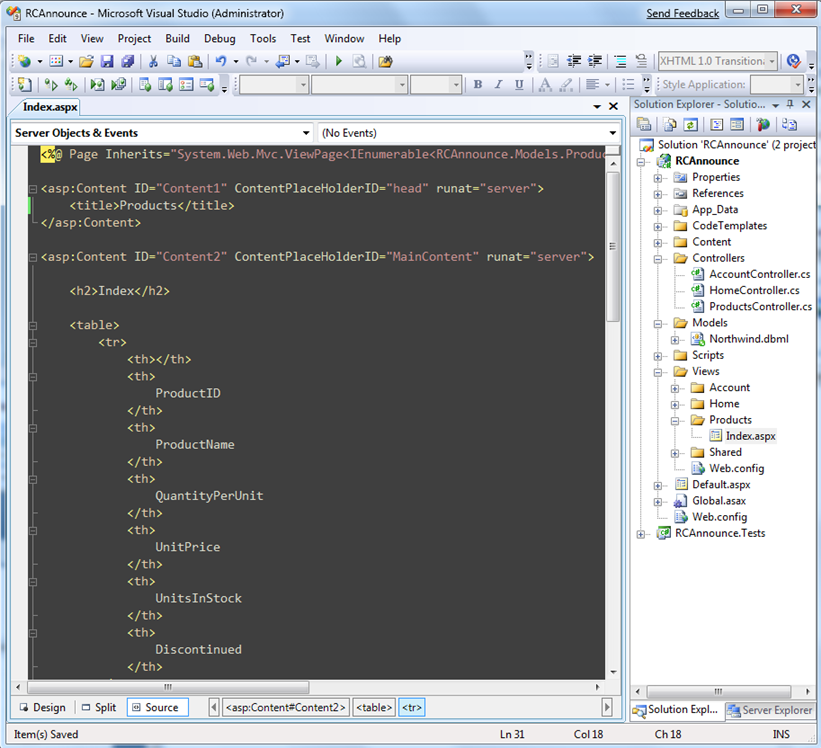
    Clicking the “Add” button will cause a view template to be created for us within the \Views\Products\ directory with a default “scaffold” implementation:

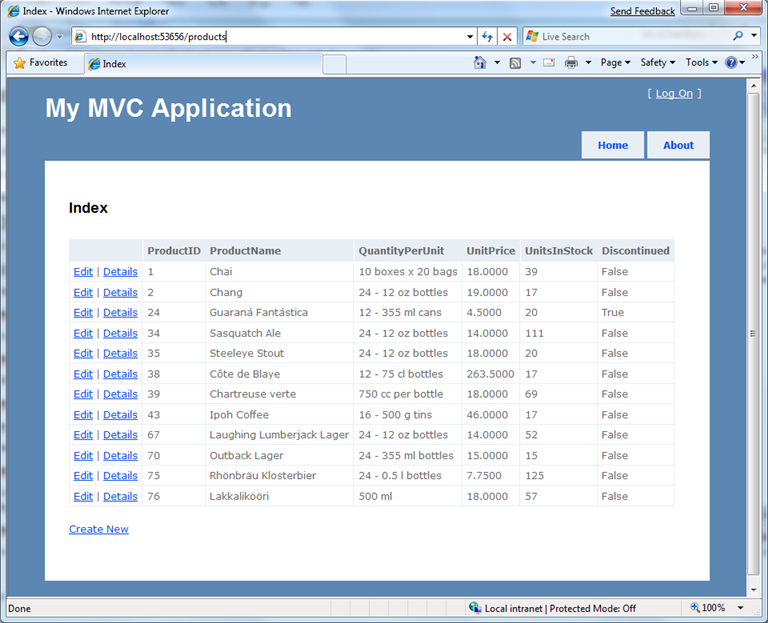
    We can then run our application and request the /products URL within our browser to see a listing of our retrieved products:

    The RC ships with a number of built-in scaffold templates: “Empty”, “List”, “Details”, “Edit” and “Create” (you can also add your own scaffold templates – more details on this in a moment). 

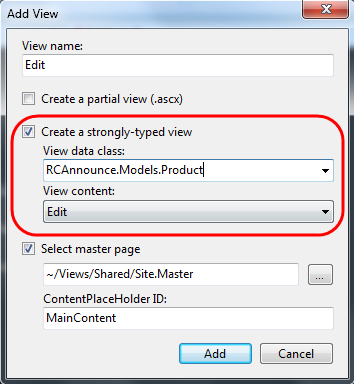
    For example, to enable product editing support we can implement the HTTP-GET version of our “Edit” action method on our Products controller like below and then invoke the “Add View” command:

    Within the “Add View” dialog we can indicate we are passing a “Product” object to our view and choose the “Edit” template option to scaffold it:

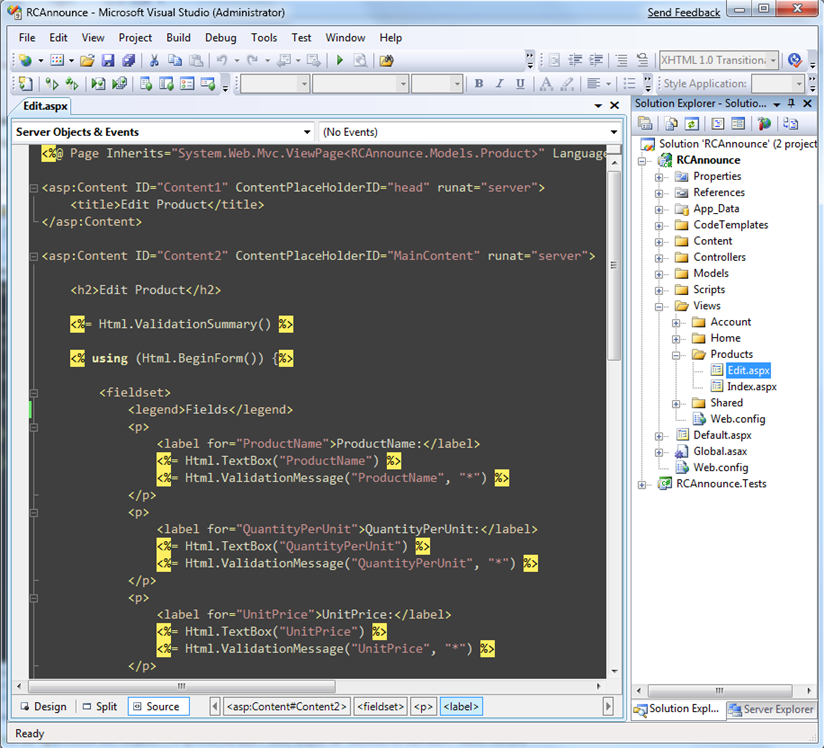
    Clicking the “Add” button will cause an edit view template to be created with a default scaffold implementation within the \Views\Products\ directory:

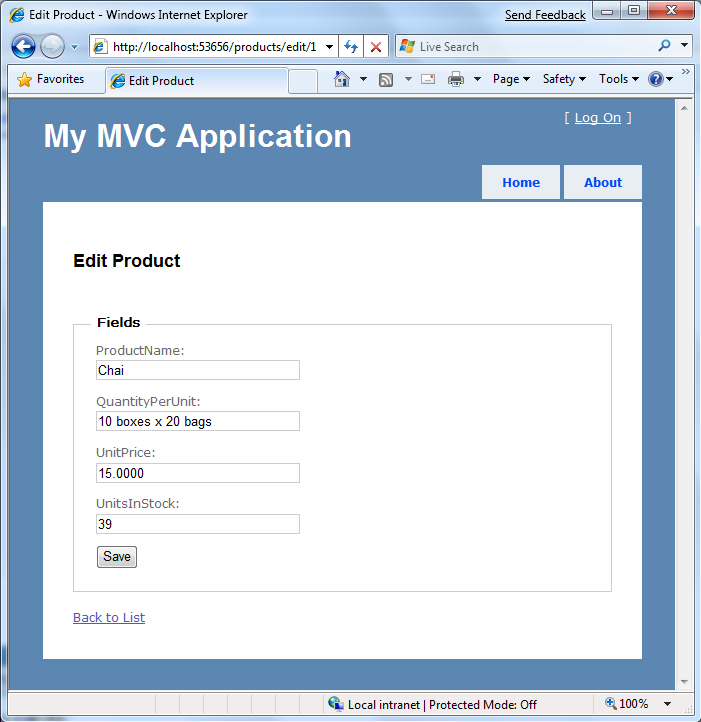
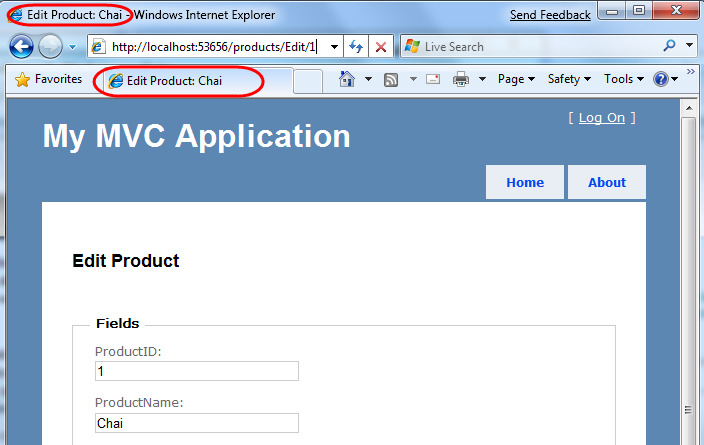
    We can then run our application and request the /products/edit/1 URL within our browser to edit the Product details:

    To save edit changes we can implement the HTTP-POST version of our “Edit” action method on our Products controller:

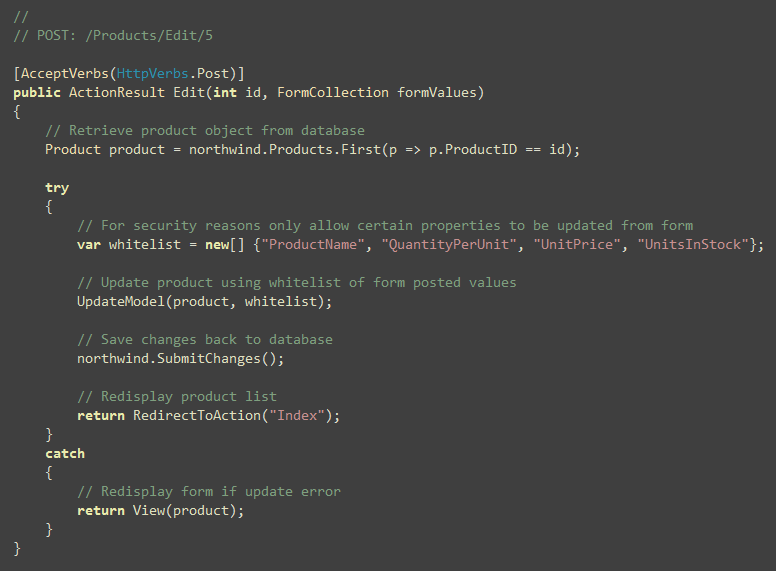
    Notice in the code above how in the case of an error (for example: someone enters a bogus string for a number value) we redisplay the view.  The “edit” and “create” scaffold templates contain the HTML validation helper methods necessary to preserve user input and flag invalid input elements in red when this happens:

    You’ll rarely end up using a scaffold-created template exactly as-is, and often will end up completely replacing it.  But being able to get an initial implementation up and running quickly, and having an initial view template for your scenario that you can then easily tweak is really useful.

    Because the scaffold infrastructure supports scaffolding views against any plain-old CLR object, you can use it with both domain model objects (including those mapped with LINQ to SQL, LINQ to Entities, nHibernate, LLBLGen Pro, SubSonic, and other popular ORM implementations) as well as to create scaffolds with custom Presentation Model/ViewModel classes.

    Adding and Customizing Scaffold Templates

    ASP.NET MVC’s scaffolding infrastructure is implemented using Visual Studio’s built-in T4 templating architecture (Scott Hanselman has a nice blog post on T4 here). 

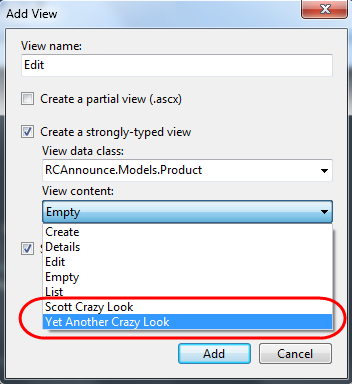
    You can customize/override any of the built-in ASP.NET MVC scaffold template implementations.  You can also create additional scaffold templates (for example: the “ScottGu Crazy Look” scaffold option) and have them be displayed as options within the “Add View” dialog.

    To customize/add scaffold templates at the machine-wide level, open the “C:\Program Files\Microsoft Visual Studio 9.0\Common7\IDE\ItemTemplates\CSharp\Web\MVC\CodeTemplates” folder:

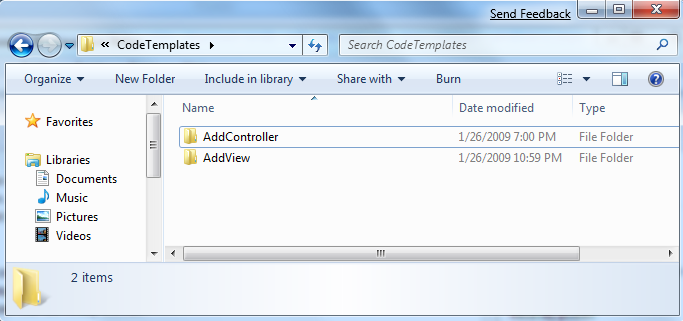
    The “AddController” sub-folder contains the scaffold template for the “Add Controller” dialog.  The “AddView” sub-folder contains the scaffold templates for the “Add View” dialog:

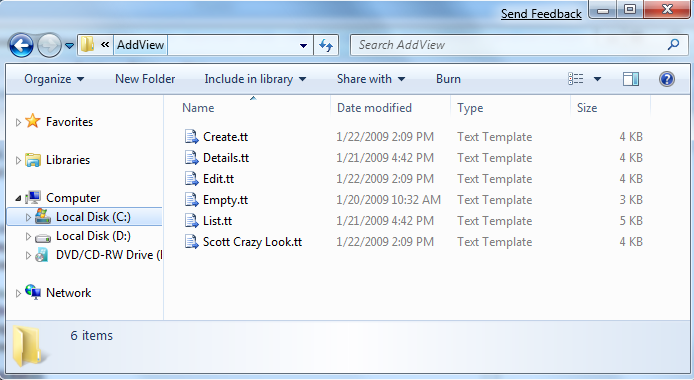
    The scaffold templates populated within the “Add View” dialog are simply text files that have the “.tt” file-name extension.  These “.tt” text files contain inline C# or VB code that executes when the template is selected. 

    You can open and edit any of the existing files to customize the default scaffolding behavior.  You can also add new “.tt” template files – like I have above with the “Scott Crazy Look.tt” file.  When you add a new template file the “Add View” dialog will be updated to automatically include it in the list of available scaffold options:

    In addition to customizing/adding template files at the machine level, you can also add/override them at the individual project level.  This also enables you to check-in the templates under source control and easily use them across a team.

    You can customize the scaffold templates at a project level by adding a “CodeTemplates” folder underneath your project.  You can then have “AddController” and “AddView” sub-folders within it:

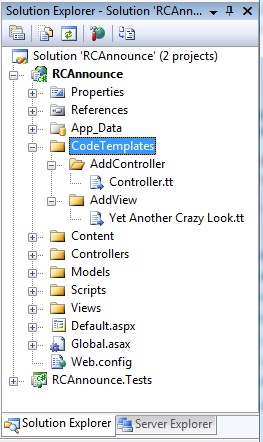
    You can override any of the default machine-wide templates simply be adding a “.tt” file with the same name to the project.  For example, above we are overriding the default “Controller.tt” scaffold template used in “Add Controller” scenarios. 

    You can add new view-template scaffold files to the list by placing them within the “AddView” folder.  For example, above we added a “Yet Another Crazy Look.tt” view template to our project.  When we use the “Add View” dialog we’ll now see a union of the templates defined at the machine and project level:

    Note: When you add “.tt” templates under the \CodeTemplates folder make sure to set the “Custom Tool” property of each of the “.tt” template files to an empty string value within the property grid (otherwise you’ll get an error trying to run it).  You might also need to close and reopen the project to clear a spurious error from the error list.  We’ll be publishing more blog posts that cover creating/customizing scaffolding templates shortly.

    Go To Controller / Go To View

    The RC build now supports the ability to quickly navigate between the Controllers and Views within your projects. 

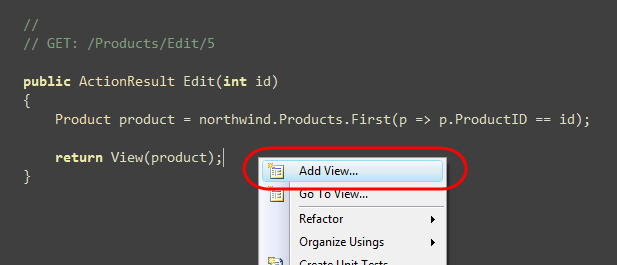
    When your cursor is within a Controller action method you can type Ctrl-M, Ctrl-G to quickly navigate to its corresponding view template.  You can also perform this same navigation jump by right-clicking within the action method and selecting the “Go To View” menu option:

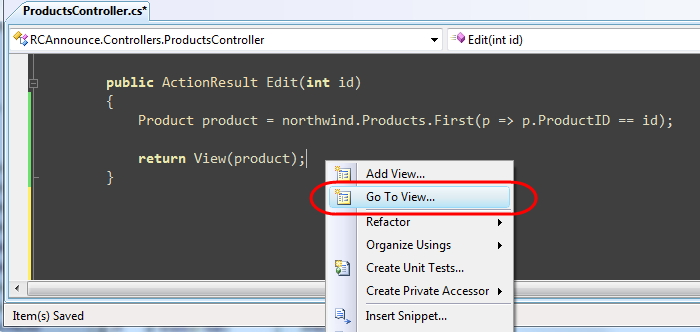
    In the example above we used the “Go To View” command within the “Edit” action method of the ProductsController class.  This will cause the \Views\Products\Edit.aspx view template to be opened and have the default focus within VS:

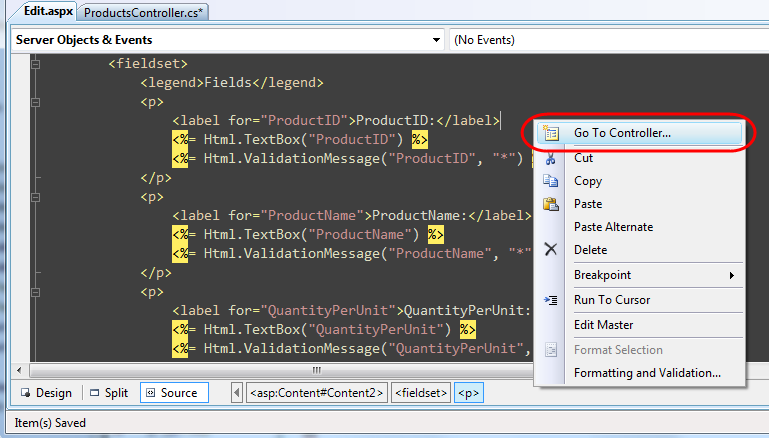
    Within view templates you can also now type Ctrl-M, Ctrl-G to quickly navigate to the view’s corresponding Controller class.  You can also perform this navigation jump by right-clicking within the view template and selecting the “Go To Controller” menu option:

    MSBuild Task for Compiling Views

    By default when you do a build on an ASP.NET MVC project it compiles all code within the project, except for the code within view template files.  With the ASP.NET MVC Beta you had to roll your own MSBuild task if you wanted to compile the code within view templates.  The ASP.NET MVC RC build now includes a built-in MSBuild task that you can use to include views as part of the project compilation process.  This will verify the syntax and code included inline within all views, master pages, and partial views for the application, and give you build errors if it encounters any problems.

    For performance reasons we don't recommend running this for quick compiles during development, but it is convenient to add to particular build configuration profiles (for example: staging and deployment) and/or for use with Build or CI (continuous integration) servers.  Please review the release notes for the steps to enable this.

    View Refactoring Support

    The names of the files and folders under the \Views application sub-folder will now automatically be updated when you perform controller class rename or action method rename using the “Rename” refactoring command in VS 2008.  VS 2008 will apply the standard convention-based naming pattern to existing view files/folders when the Controller class is updated.

    View Improvements

    The RC build includes a number of view-specific enhancements that were incorporated based on feedback during the preview releases.

    Views without Code-Behind Files

    Based on feedback we’ve changed view-templates to not have a code-behind file by default.  This change helps reinforce the purpose of views in a MVC application (which are intended to be purely about rendering and to not contain any non-rendering related code), and for most people eliminates unused files in the project.

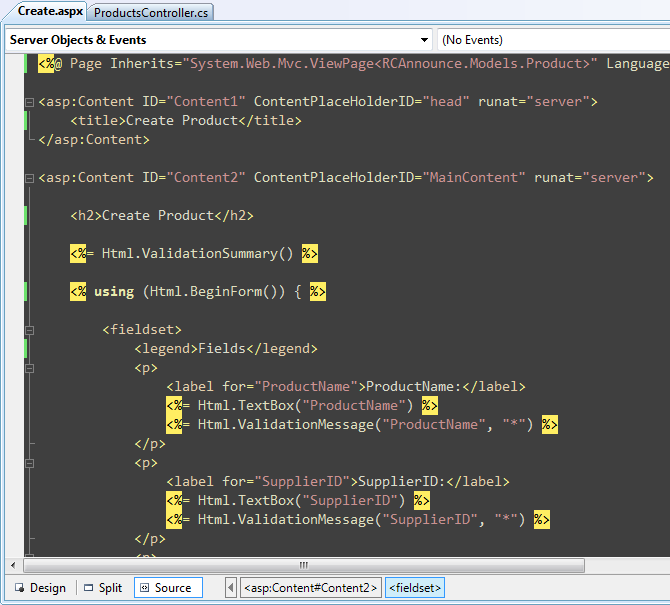
    The RC build now adds C# and VB syntax support for inheriting view templates from base classes that use generics.  For example, below we are using this with the Edit.aspx view template – whose “inherits” attribute derives from the ViewPage<Product> type:

    One nice benefit of not using a code-behind file is that you'll now get immediate intellisense within view template files when you add them to the project.  With previous builds you had to do a build/compile immediately after creating a view in order to get code intellisense within it.  The RC makes the workflow of adding and immediately editing a view compile-free and much more seamless.

    Important: If you are upgrading a ASP.NET MVC project that was created with an earlier build make sure to follow the steps in the release notes – the web.config file under the \Views directory needs to be updated with some settings in order for the above generics based syntax to work.

    Model Property

    With previous builds of ASP.NET MVC, you accessed the strongly typed model object passed to the view using the ViewData.Model property:

    The above syntax still works, although now there is also a top-level "Model" property on ViewPage that you can also use:

    This property does the same thing as the previous code sample - its main benefit is that it allows you to write the code a little more concisely.  It also allows you to avoid using the ViewData dictionary in cases where you want the view template to only interact with the strongly-typed model passed to it.

    Setting the Title

    The default master-page template added to new ASP.NET MVC projects now has an <asp:contentplaceholder/> element within its <head> section.  This makes it much easier for view templates to control the <title> element of the HTML page rendered back – and not require the Controller to explicitly pass a “title” parameter to configure it (which was the default with previous ASP.NET MVC builds and we thought questionable from a responsibilities perspective). 

    For example, to customize the <title> of our Edit view to include the current product name we can now add the below code to our Edit.aspx template to drive the title directly off of the model object being passed the view:

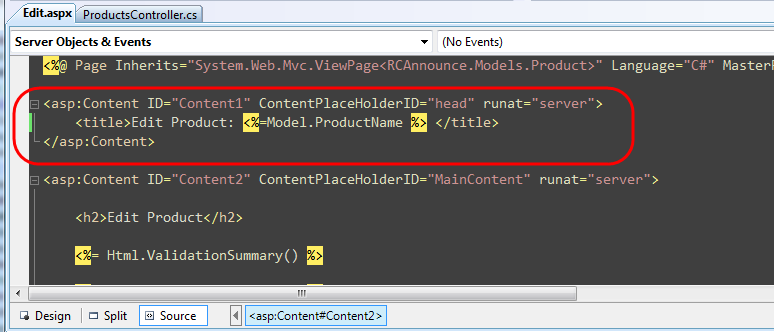
    The above code will then cause the browser to render the title using the Product name at runtime:

    In addition to setting the <title> element, you can also use the above approach to dynamically add other <head> elements at runtime.  Another common scenario this is useful with is configuring model/view specific <meta/> elements for search engine optimization. 

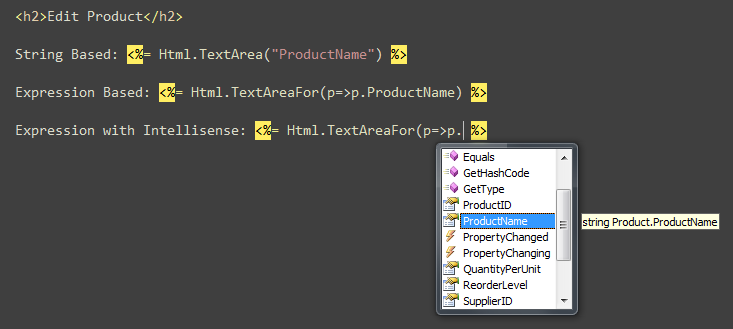
    Strongly Typed HTML/AJAX Helpers

    One of the requests a few people have asked for is the ability to use strongly-typed expression syntax (instead of strings) when referring to the Model when using a View's HTML and AJAX helper objects.

    With the beta build of ASP.NET MVC this wasn't possible, since the HtmlHelper and AjaxHelper helper classes didn't expose the model type in their signature, and so people had to build helper methods directly off of the ViewPage<TModel> base class in order to achieve this. 

    The ASP.NET MVC RC build introduces new HtmlHelper<TModel> and AjaxHelper<TModel> types that are exposed on the ViewPage<TModel> base class.  These types now allow anyone to build strongly-typed HTML and AJAX helper extensions that use expression syntax to refer to the View's model.  For example:

    The HTML form helper extension methods in the core ASP.NET MVC V1 assembly still use the non-expression based string syntax.  The “MVC Futures” assembly released today (which works with the RC) has a few initial implementations of expression-syntax based form helper methods.   We are going to iterate on these a bit longer and then consider adding them into the ASP.NET MVC core assembly in the next release. 

    You can of course also add your own helper methods (using either strings or strongly-typed expressions).  The built-in HTML/AJAX helper methods can also optionally be removed (because they are extension methods) if you want to replace or override them with your own

    Form Post Improvements

    The RC build includes a number of form-post specific enhancements:

    [Bind(Prefix=””)] No Longer Required for Common Scenarios

    The RC build no longer requires you to explicitly use a [Bind] attribute (or set its prefix value to “”) in order to map incoming form post parameters that do not have a prefix to complex action method parameters.

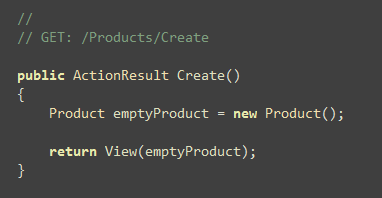
    To see what this means, let’s implement the “Create” scenario for our ProductsController.  We’ll begin by implementing the HTTP-GET version of our “Create” action method.  We’ll do this with code below that returns a View based on an empty Product object:

    We can then right-click within our action method, choose the “Add View” command and scaffold a “create” view template that is based on a Product:

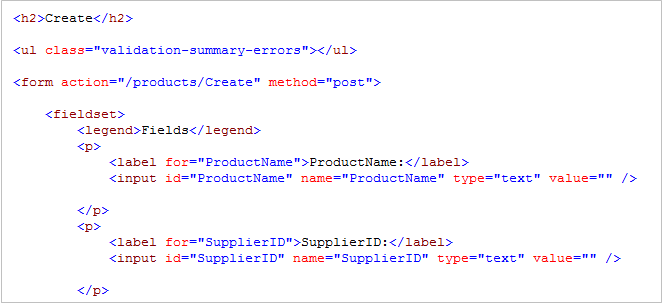
    Notice above how our Html.TextBox() helper methods are referencing the “ProductName” and “SupplierID” properties on our Product object.  This will generate HTML markup like below where the input “name” attributes are “ProductName” and “SupplierID”:

    We can then implement the HTTP-POST version of our “Create” action method. We’ll have our action method take a Product object as a method parameter:

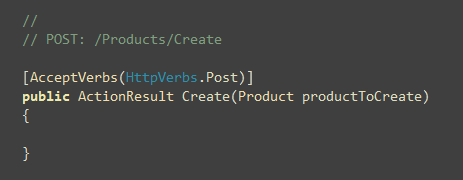
    With the ASP.NET MVC Beta we would have had to add a [Bind(Prefix=””)] attribute in front of our Product argument above – otherwise the ASP.NET MVC binding infrastructure would have only looked for form post values with a “productToCreate.” prefix (for example: productToCreate.ProductName and productToCreate.SupplierID) and not found the submitted values from our form (which don’t have a prefix). 

    With the RC build, the default action method binders still first attempt to map a productToCreate.ProductName form value to the Product object.  If they don’t find such a value, though, they now also attempt to map “ProductName” to the Product object.  This makes scenarios where you pass in complex objects to an action method syntactically cleaner and less verbose.  You can take advantage of this feature both when mapping domain objects (like our Product object above) as well as with Presentation Model/ViewModel classes (like a ProductViewModel class).

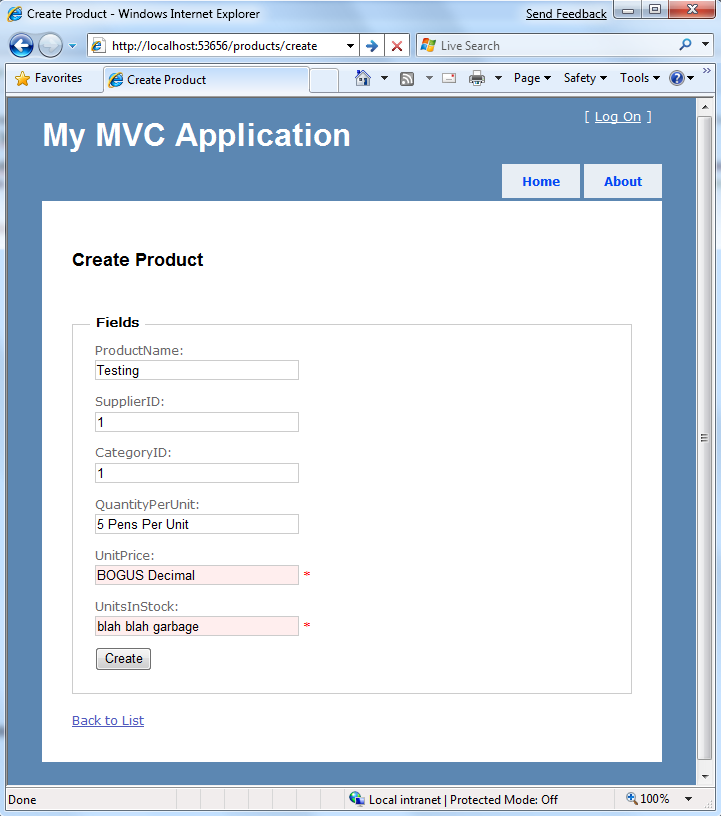
    A completed implementation of our Create action method (including basic input type error handling) might look like below:

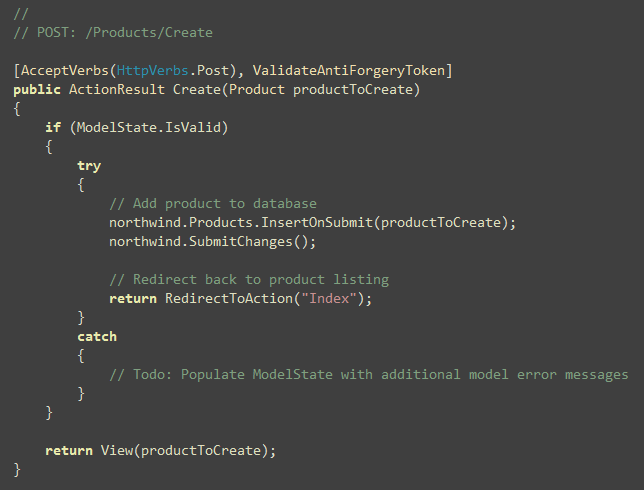
    Now our create action will save the Product object if all values are entered correctly.  When a user attempts to create a Product with invalid Product property values (for example: a string “Bogus” instead of a valid Decimal value), the form will redisplay and flag the invalid input elements in red:

    ModelBinder API Improvements

    The model binding infrastructure within the ASP.NET MVC Release Candidate has been refactored to add additional extensibility points to enable custom binding and validation schemes.  You can read more about these details in the ASP.NET MVC RC release notes.

    Model Binders can also now be registered for interfaces in addition to classes. 

    IDataErrorInfo Support

    The default model binder with ASP.NET MVC now supports classes that implement the IDataErrorInfo interface.  This enables a common approach to raise validation error messages in a way that can be shared across Windows Forms, WPF and now ASP.NET MVC applications.

    Unit Testing Improvements

    The ASP.NET MVC RC includes some significant improvements to unit testing:

    ControllerContext changed to no longer derive from RequestContext

    The RC build includes a refactoring of the ControllerContext class that significantly simplifies common unit testing scenarios.  The ControllerContext class no longer derives from RequestContext and now instead encapsulates RequestContext and exposes it as a property.  The properties of ControllerContext and its derived types are also now virtual instead of sealed – making it significantly easier to create mock objects.

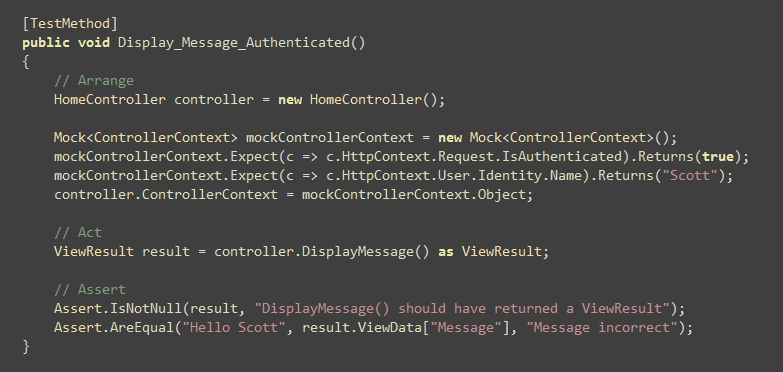
    To see how this helps, let’s consider an action method like below that uses both the “Request” and “User” intrinsic objects:

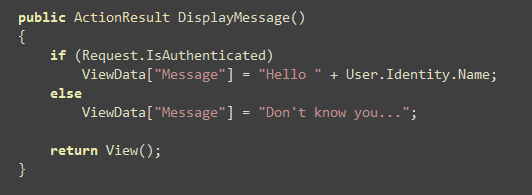
    Testing the above action method with previous ASP.NET MVC builds would have required mocking RequestContext and ControllerContext (with some non-obvious constructors that also brought in a RouteData object).

    With the RC build we can now unit test it like below (using Moq to mock a ControllerContext for our Controller that allows us to simulate the Request.IsAuthenticated and User.Identity.Name properties):

    The refactoring improvements made help out not just with testing Controller actions – but also help with testing filters, routes, custom actionresult types, and a variety of other scenarios.

    AccountsController Unit Tests

    The ASP.NET MVC Project Template included with the RC build now adds 25 pre-built unit tests that verify the behavior of the AccountsController class (which is a controller added to the project by default to handle login and account management scenarios).  This makes refactoring/updating AccountsController easier.  The AccountsController implementation has also been modified to more easily enable non-Membership Provider based credential systems to be integrated.

    Cross Site Request Forgery (CSRF) Protection

    Cross-site request forgery (CSRF) attacks (also referred to as XSRF attacks) cause users of a trusted browser agent to take unintended actions on a site.  These attacks rely on the fact that a user might still be logged in to another site.  A malicious Web site exploits this by creating a request to the original site (for example: by linking to a URL on the site using a <img src=””/> element on the hacker site). The request is made using the user’s browser and thus with the user’s authentication token and credentials. The attacker hopes that the user’s authentication or session cookie is still valid and if so, the attacker can sometimes take disruptive action.  You can learn more about this hacking technique here.

    The ASP.NET MVC RC now includes some built-in CSRF protection helpers that can help mitigate CSRF attacks.  For example, you can now use the Html.AntiForgeryToken() helper to render a hidden input token within forms:

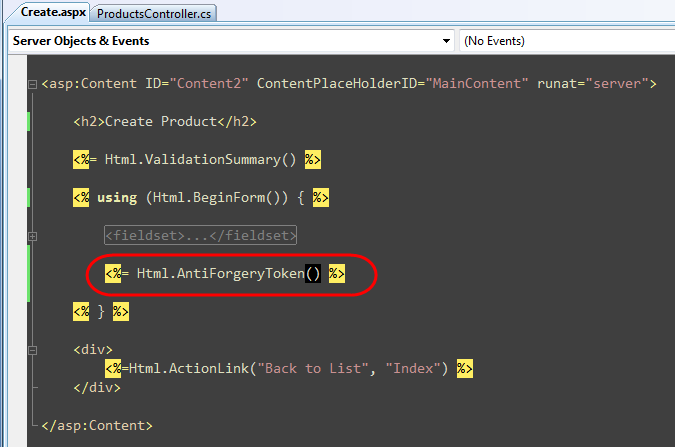
    This helper issues a HTTP cookie and renders a hidden input element into our form.  Malicious web-sites will not be able to access both values.

    We can then apply a new [ValidateAntiForgeryToken] attribute onto any action method we want to protect:

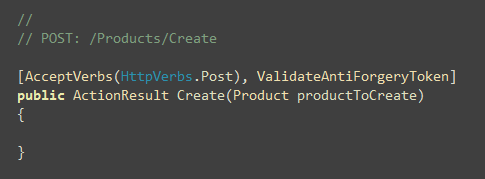
    This will check for the existence of the appropriate tokens, and prevent our HTTP-POST action method from running if they don’t match (reducing the chance of a successful CSRF attack).

    File Handling Improvements

    The ASP.NET MVC RC includes a number of file handling enhancements:

    FileResult and File() helper method

    The RC build adds a new FileResult class that is used to indicate that a file is being returned as an ActionResult from a Controller action method.  The Controller base class also now has a set of File() helper methods that make it easy to create and return a FileResult.

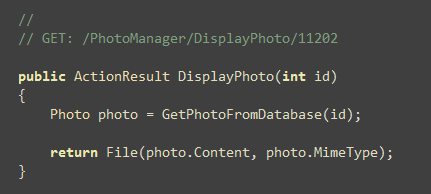
    For example, let’s assume we are trying to build a photo management site.  We could define a simple “Photo” class like below that encapsulates the details about a stored Photo:

    We could then use the new File() helper method like below to implement a “DisplayPhoto” action method on a PhotoManager controller that could be used to render the Photo out of a database store.  In the code below we are passing the File() helper the bytes to render, as well as the mime-type of the file. If we pointed a <img src=””/> element at our action method URL the browser would display the photo inline within a page:

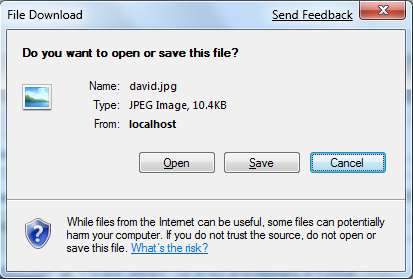
    If we wanted an end-user to be able to download the photo and save it locally, we could implement a “DownloadPhoto” action method like below.  In the code below we are passing a third parameter – which will cause ASP.NET MVC to set a header that causes the browser to display a “Save As…” dialog which is pre-populated with the filename we’ve supplied:

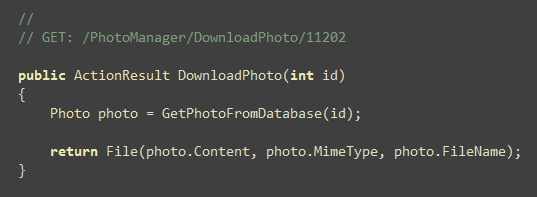
    When a user clicks a link to the /PhotoManager/DowloadPhoto/1232 URL they’ll be prompted to save the picture:

    File Uploading Support

    The RC build also includes built-in model-binder support for uploaded files and multi-part mime content. 

    For example, we could have a <form> whose enctype attribute is set to “multipart/form-data” perform a post to the /PhotoManager/UploadPhoto URL.  If a <input type=”file” name=”fileToUpload”/> element was within the form it would cause the file selected by the end-user to be passed to our action method as an HttpPostedFileBase object:

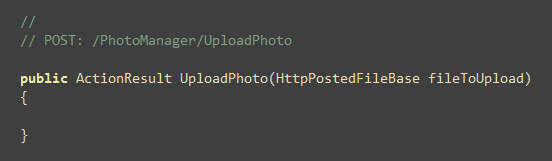
    We could then use the HttpPostedFileBase object to get access to the raw bytes of the uploaded file, its mime-type, and optionally save it to a database or disk.

    AJAX Improvements

    The ASP.NET MVC RC includes a number of AJAX enhancements:

    jQuery Intellisense Files included within ASP.NET MVC Project Template

    Newly created ASP.NET MVC projects now include both the standard jQuery library (both full and compressed versions), as well as the –vsdoc intellisense documentation file used by Visual Studio to provide richer intellisense support for it (you can learn more about this here):

    This enables rich jQuery JavaScript intellisense within client-script blocks and JavaScript files:

    Today’s RC build ships jQuery 1.2.6.  We are planning to ship the upcoming jQuery 1.3.1 release for the final ASP.NET MVC 1.0 release, and will include an updated JavaScript intellisense file for it. 

    Request.IsAjaxRequest Property

    The Request.IsAjaxRequest property can be used to detect whether a request is being sent from an AJAX call on the client (and is useful for scenarios where you want to gracefully degrade if AJAX is not enabled).  The logic within this method was updated with the RC to now recognize the “X-Requested-With” HTTP header (in addition to the form field sent by ASP.NET AJAX).  This is a well known header sent by JavaScript libraries such a Prototype, jQuery, and Dojo – and now enables a unified way to check for AJAX within an ASP.NET MVC request. 

    JavaScriptResult ActionResult and JavaScript() helper method

    The Controller base class now has a JavaScript() helper method that returns a new ActionResult class of type JavaScriptResult.  This supports the ability to return raw JavaScript that will then be executed on the client by the built-in ASP.NET MVC helper methods.  This can be useful for scenarios where you want to cause conditional JavaScript to execute on the client based on server logic.

    Summary

    We are pretty excited to be in the final “home stretch” of ASP.NET MVC V1.  Please report any issues you find with the RC build as soon as possible so that we can get them resolved for the final release.  The team plans to carefully monitor feedback over the next few weeks, and assuming no big issues come up ship the official V1 build next month.

    Hope this helps,

    Scott


    Microsoft EnterpriseLibrary 암호화에  파일을 참조합니다.

    라이브러리 참고  및 다운로드 사이트

    http://msdn.microsoft.com/en-us/library/dd203099.aspx


    시작

    image


    Microsoft EnterpriseLibrary 설치되면

    image

    위의 그림처럼 UI 형태로 수정할수 있는 화면을 볼수 있습니다.


    마우스 오른쪽을 클릭해서 Cryptography Application Block 을 추가합니다.

    image


    Symmetric Providers 에서 마우스 오른쪽으로 New 클릭

    image


    오케이

    image

    암호화 키를 만들어 줍니다.


    image

    Generate 클릭


     image


    image


    키를 저장할 위치설정


    image

    현재 사용자만 엑세스 할껀지 전부가능할껀지 선택


    image


    완료

    만들고 나면 WEB.CONFIG 에는 아래와 같은 코드가 만들어집니다.


    <securityCryptographyConfiguration>
      <symmetricCryptoProviders>
        <add algorithmType="System.Security.Cryptography.RijndaelManaged, mscorlib, Version=2.0.0.0, Culture=neutral, PublicKeyToken=b77a5c561934e089"
          protectedKeyFilename="파일위치\Test.key"
          protectedKeyProtectionScope="CurrentUser" type="Microsoft.Practices.EnterpriseLibrary.Security.Cryptography.SymmetricAlgorithmProvider, Microsoft.Practices.EnterpriseLibrary.Security.Cryptography, Version=4.1.0.0, Culture=neutral, PublicKeyToken=31bf3856ad364e35"
          name="RijndaelManaged" />
      </symmetricCryptoProviders>
    </securityCryptographyConfiguration>


    코드상에서 실제로 사용하기

    image


    RijndaelManaged 라는 이름으로 만들었으므로

    using Microsoft.Practices.EnterpriseLibrary.Security.Cryptography;

    public static string Encrypt(string dataToEncrtypt)
    {
        string encryptedData = Cryptographer.EncryptSymmetric("RijndaelManaged", dataToEncrtypt);
        return encryptedData;
    }

    public static string Decrypt(string cipheredString)
    {
        string decryptedString = Cryptographer.DecryptSymmetric("RijndaelManaged", cipheredString);
        return decryptedString;
    }


    참고로 이파일을 들고 다른피시에서 똑같이 복사해도(암호화키 가지고 가서도)

    암호화 키가 달라서  같은 해독되지 않습니다.

    image

    1.위의 구조를 가진 데이터리더를 받았다

    SqlDataReader reader = command.ExecuteReader();


    2. 만약 저위의 칼럼을 알수 없을때 Load 를 사용하면  위와같은 디비스키마를 받아온다
    DataTable tbl = new DataTable();
    if (reader.HasRows)
       tbl.Load(reader);

    foreach (DataColumn c in tbl.Columns)
    {

        Response.Write(c.ColumnName + "<br>");

    }

    + Recent posts