시퀸스 생성하는 프로시저 만들기

엔티티 모델에서 프로시저 등록하기

가져오기

        public int GetProgramSeq()
        {
            int i = 0;
            using (PbotEntities ctx = new PbotEntities())
            {
             
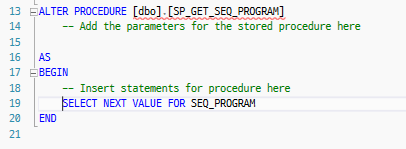
                var results = ctx.SP_GET_SEQ_PROGRAM();
                long? nextSequenceValue = results.SingleOrDefault();
             
                if( int.TryParse( nextSequenceValue.Value.ToString() , out i ))
                {
                    i = int.Parse(nextSequenceValue.Value.ToString());
                }

                return i;
            }
        }

https://docs.microsoft.com/ko-kr/dotnet/csharp/tutorials/attributes


특성 - C#

C#에서 특성이 작동하는 방식을 알아봅니다.

docs.microsoft.com

사용안하는 메소드 표시 방법

[Obsolete]
public class MyClass
{

}


[Obsolete("ThisClass is obsolete. Use ThisClass2 instead.")]
public class ThisClass
{

}


아래와 같이 바꾸기

:RadWindow 사용


App.xaml.cs

using System;
using System.Collections.Generic;
using System.Configuration;
using System.Data;
using System.Linq;
using System.Threading.Tasks;
using System.Windows;

namespace WpfApp1
{
    /// <summary>
    /// App.xaml에 대한 상호 작용 논리
    /// </summary>
    public partial class App : Application
    {
        protected override void OnStartup(StartupEventArgs e)
        {
            new MainWindow().Show();
            base.OnStartup(e);
        }
    }
}

App.xaml 

StartupUri="MainWindow.xaml" 항목제거

<Application x:Class="WpfApp1.App"
             xmlns="http://schemas.microsoft.com/winfx/2006/xaml/presentation"
             xmlns:x="http://schemas.microsoft.com/winfx/2006/xaml"
             xmlns:local="clr-namespace:WpfApp1"
             >
    <Application.Resources>
         
    </Application.Resources>
</Application>

MainWindow.xaml.cs

MainWindow : Window ->  MainWindow : RadWindow 로 변경


MainWindow.xaml

<Window Tag를  telerik:RadWindow 로 변경 하면 끝

<telerik:RadWindow
        xmlns="http://schemas.microsoft.com/winfx/2006/xaml/presentation"
        xmlns:x="http://schemas.microsoft.com/winfx/2006/xaml"
        xmlns:d="http://schemas.microsoft.com/expression/blend/2008"
        xmlns:mc="http://schemas.openxmlformats.org/markup-compatibility/2006"
        xmlns:local="clr-namespace:WpfApp1"
        xmlns:navigation="clr-namespace:Telerik.Windows.Controls.Navigation;assembly=Telerik.Windows.Controls.Navigation"
        navigation:RadWindowInteropHelper.ShowInTaskbar="True"
        xmlns:telerik="http://schemas.telerik.com/2008/xaml/presentation" xmlns:Controls="clr-namespace:Telerik.Windows.Controls;assembly=Telerik.Windows.Controls" x:Class="WpfApp1.MainWindow"
        mc:Ignorable="d"

         Height="450" Width="800">
    <Grid Margin="8,0,-8,0">
        <Grid.RowDefinitions>
            <RowDefinition Height="Auto" MinHeight="154"/>
            <RowDefinition/>
        </Grid.RowDefinitions>
        <telerik:RadRibbonView x:Name="radRibbonView" VerticalAlignment="Top" Height="151" Margin="-10,0,10,0">
            <telerik:RadRibbonTab Header="File">
                <telerik:RadRibbonGroup Header="Icon Test">
                    <telerik:RadRibbonButton Size="Large" LargeImage="pack://siteoforigin:,,,/Resources/open.png" Margin="0,0,0,-1" HorizontalAlignment="Stretch" MinHeight="2"/>
                </telerik:RadRibbonGroup>
            </telerik:RadRibbonTab>
            <telerik:RadRibbonTab/>
            <telerik:RadRibbonTab/>
        </telerik:RadRibbonView>
        <telerik:RadDocking HasDocumentHost="True" HorizontalAlignment="Stretch" Margin="-10,2,10,0" VerticalAlignment="Stretch" Grid.Row="1">
            <telerik:RadSplitContainer>
                <telerik:RadPaneGroup HorizontalAlignment="Stretch" VerticalAlignment="Stretch">
                    <telerik:RadPane Header="Pane 1"/>
                </telerik:RadPaneGroup>
            </telerik:RadSplitContainer>
        </telerik:RadDocking>

    </Grid>
</telerik:RadWindow>


아래와 같이 하면 이미지파일로 떨어진다.

mycallback 에서 파일정보를 얻을수 있다.

function makeBlob() {

    var blob = myDiagram.makeImageData({
        background: "white"
        , returnType: "blob"
        , scale: 1
        , callback: myCallback
    });

    //
   

}

파일 서버로 보내기

// When the blob is complete, make an anchor tag for it and use the tag to initiate a download
// Works in:
// * Chrome
// * IE11, Edge
// * Firefox
function myCallback(blob) {
//서버로 전송
    $.ajax({
        type: "POST",
        url: "/api/diagramUpload/100",
        data: blob,
        processData: false,
        contentType: false,
        success: function (data) {

            alert('저장성공');
        },
        error: function (message) {
            alert(message);
        }
    });

    return;

//여기서 부터는 파일을 웹브라우저에서 바로 다운받는다.
    var url = window.URL.createObjectURL(blob);
    var filename = "pbot.png";

    var a = document.createElement("a");
    a.style = "display: none";
    a.href = url;
    a.download = filename;

    // IE 11
    if (window.navigator.msSaveBlob !== undefined) {
        window.navigator.msSaveBlob(blob, filename);
        return;
    }

    document.body.appendChild(a);
    requestAnimationFrame(function () {
        a.click();
        window.URL.revokeObjectURL(url);
        document.body.removeChild(a);
    });
}

ASP.NET API 에서 파일을 다운로드 하는방법

       /// <summary>  프로젝트 파일을 저장 합니다.</summary>
        /// <returns></returns>
        [System.Web.Http.Route("api/diagramUpload/{projectId}")]
        [System.Web.Http.HttpPost]
        public Task diagramUploadAsync(int projectId)
        {
            string root = System.Web.HttpContext.Current.Server.MapPath("~/ProjectImages");
            HttpRequestMessage request = this.Request;
            var content =  request.Content;

            FileStream fileStream = null;
            string pathname =  string.Format(@"{0}\{1}.png", root, projectId);
            try
            {
                fileStream = new FileStream(pathname, FileMode.Create, FileAccess.Write, FileShare.None);
                return content.CopyToAsync(fileStream).ContinueWith(
                    (copyTask) =>
                    {
                        fileStream.Close();
                    });
            }
            catch
            {
                if (fileStream != null)
                {
                    fileStream.Close();
                }

                throw;
            }


        }


+ Recent posts